Product
CommonLook PDF Desktop Version
Feature
Tables
Document Element
Redrawing Complex Tables
Overview
A table counts as complex if it has any of the following, even if its layout looks fairly simple:
- Cells that span multiple columns or rows.
- More than one row of column headers.
- More than one column of row headers.
- Empty cells. Empty cells alone don't technically make a table complex, but linking data cells to headers, which complex tables require anyway, also makes sure a table with empty cells reads correctly to screen readers.
Every complex table needs its data cells linked to the correct header cells so a screen reader can make the right associations.
If a table's column and row headers already line up directly with their data, CommonLook can link them automatically. If they don't line up, you'll need to redraw the table in the Table Editor first, then link it. This article covers both: how to check whether automatic linking will work, and how to redraw a table when it won't.
Prerequisites
Before you begin, make sure you have:
- A table already tagged. While technically not required, as we will be adjusting it, if the table is tagged with the correct layout and header cells tagged with the correct scope, mirroring the physical view of the Table, our job will be much easier and simpler to follow along with. See "How to Tag a Data Table in CommonLook PDF Desktop" and "How to Correct a Generated Table in CommonLook PDF Desktop" if you haven't done this yet.
- Access to the Table Editor.
Steps to Follow
Automatically link data cells to header cells
Before digging into the redrawing process, note that if your table's column and row headers line up directly with their related data cells, you can use automatic linking, even though the table still counts as complex.
- Make sure the table is tagged properly.
- Select the Table tag in the Tags tree, right-click, or otherwise open its context menu, and choose Show table editor.
- Verify the table has the correct layout, inserting, merging, or deleting cells as needed, and confirming cell span. See "How to Correct a Generated Table in CommonLook PDF Desktop" for these steps.
- Verify the header cells are tagged as TH with the correct scope, column or row. See "How to Correct a Generated Table in CommonLook PDF Desktop" for tagging header cells and assigning scope.
- Use the second button from the left at the top of the Table Editor to generate one-level linked headers. See "How to Use the Table Editor Toolbar in CommonLook PDF Desktop" for more on one-level versus recursive linked headers.
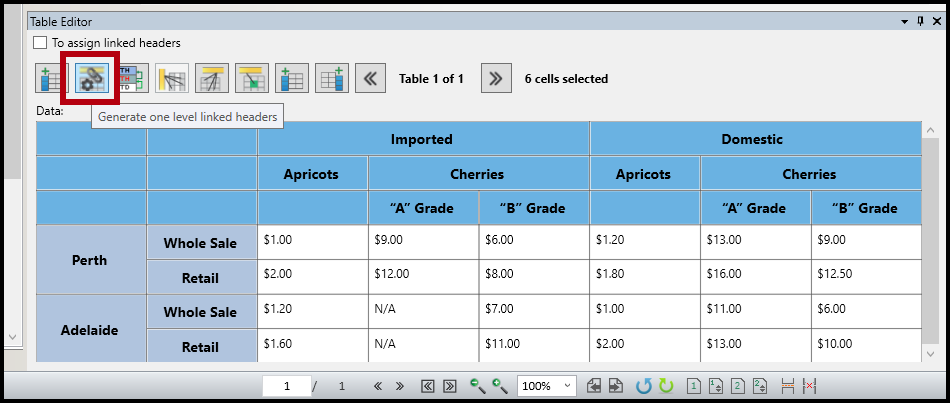
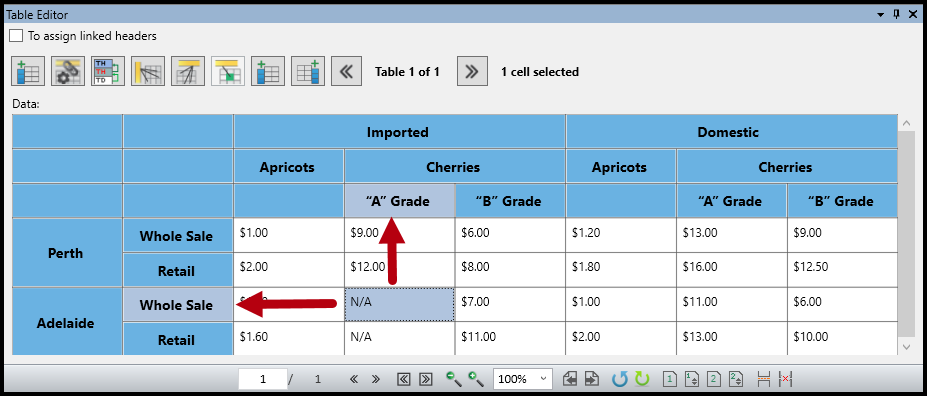
- Select a few data cells in the Table Editor to confirm they're linked to the correct headers. When a data cell is selected, its linked headers are highlighted.
Redraw a complex table
If the column or row headers don't line up directly with their related data, you'll need to redraw the table in the Table Editor before you can link it. Additionally, if marking a cell as a Column or Row Header will incorrectly connect it to content that is not related to it, you'll need to redraw it too.
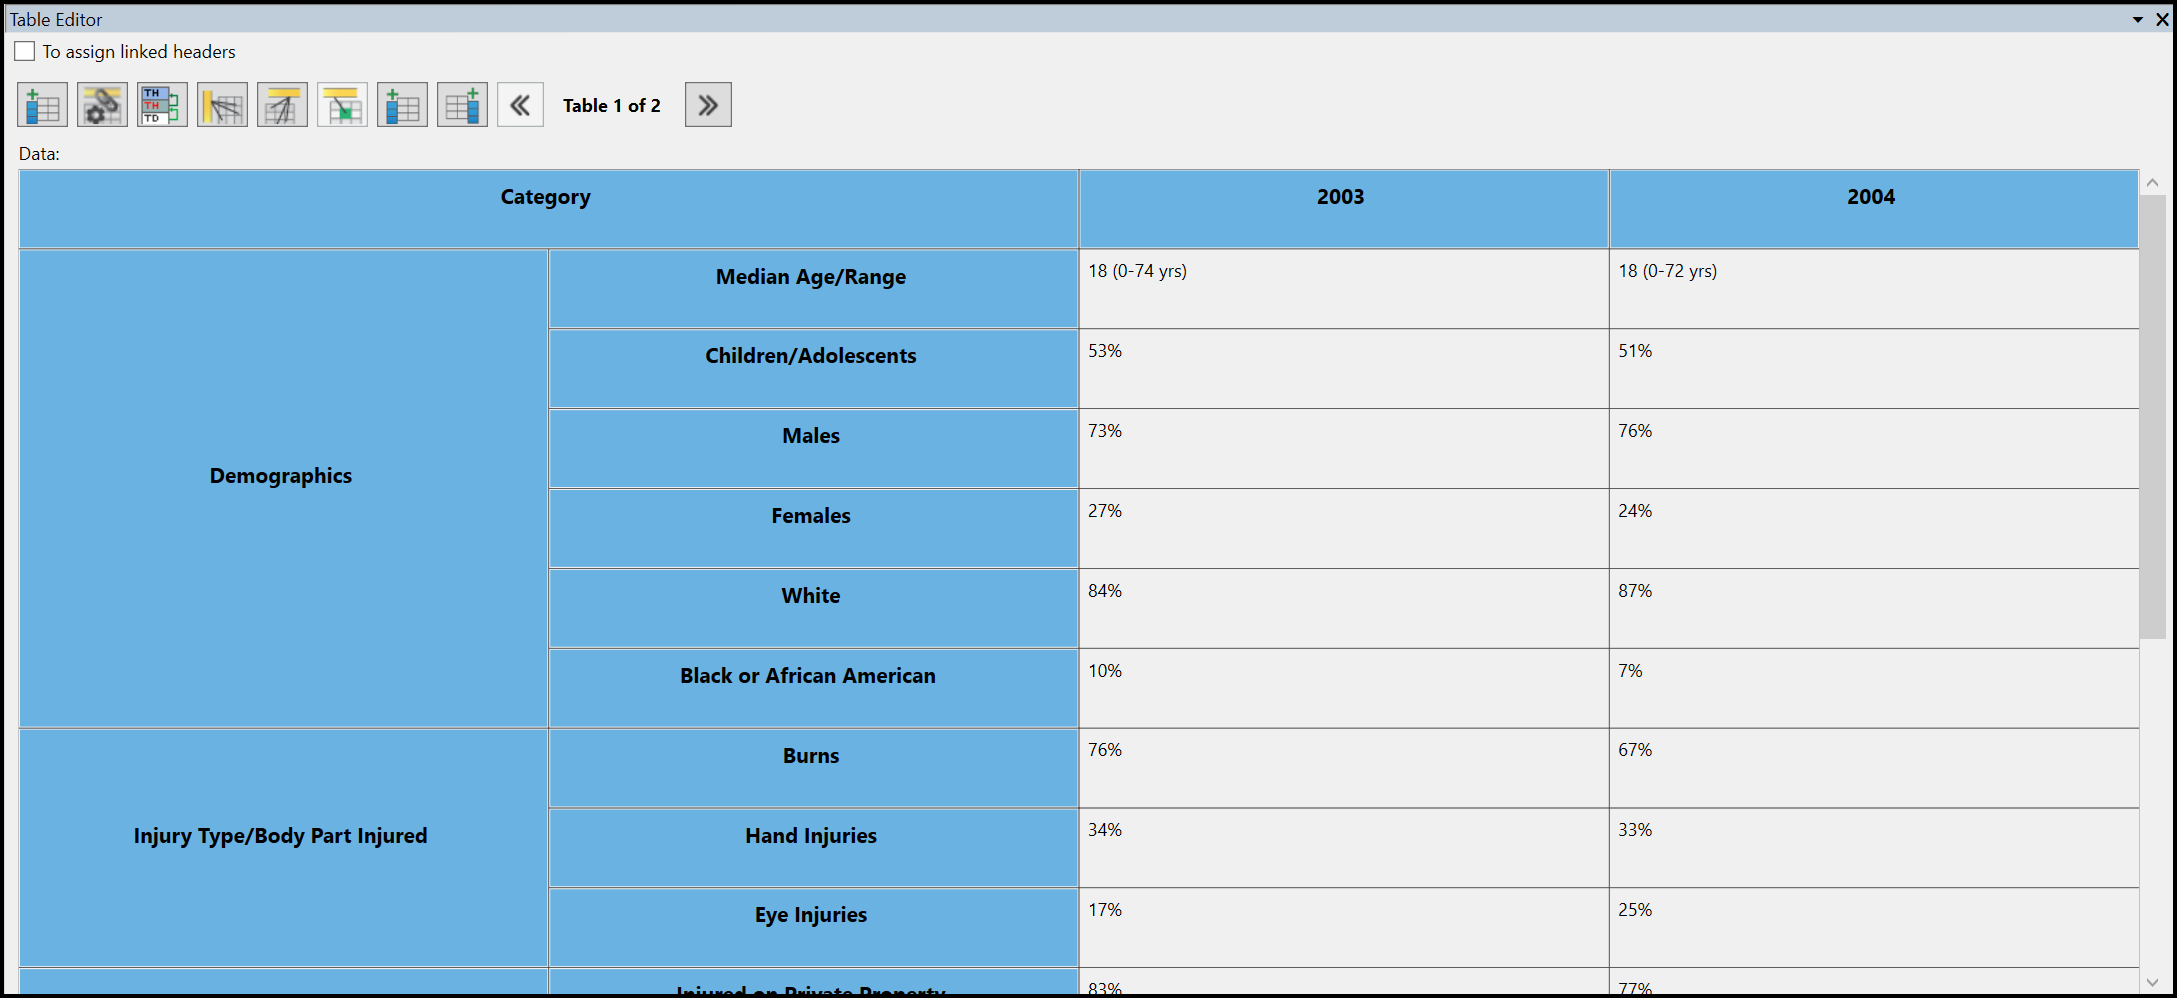
For example, here is the table we will be walking through in the beginning of this article.
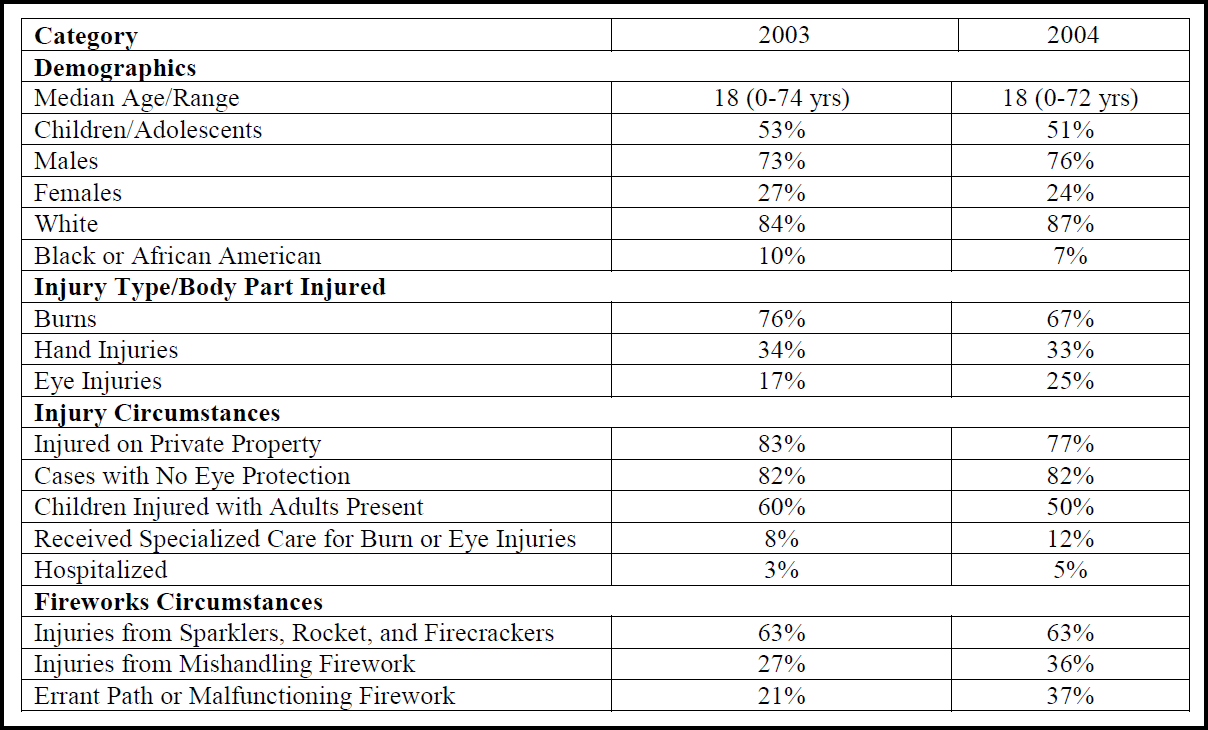
Note how the sections of the table, "Demographics," "Injury Type/Body Part Injured," "Injury Circumstances," and "Fireworks Circumstances" are positioned above the content that relates to them. For example, we would want to mark "Demographics" as a header that relates to the six rows beneath it. The issue is that if we mark "Demographics" as a Table Header with a scope of Column, it would relate to those next six rows, but also, incorrectly to the 14 rows that come after those! This would be a perfect candidate for redrawing the table, because with a bit of creative problem-solving and adjusting the layout of the table in the Table Editor, we can preserve the meaning and intended relationships of the table, but make the needed linking and connecting a very easy process.
Redrawing only changes how the table is organized in the tags, not how it looks on the page, but it also makes the table's structure easier to follow for someone using a screen reader. The walkthrough below uses one example table from start to finish to show the process.
Before
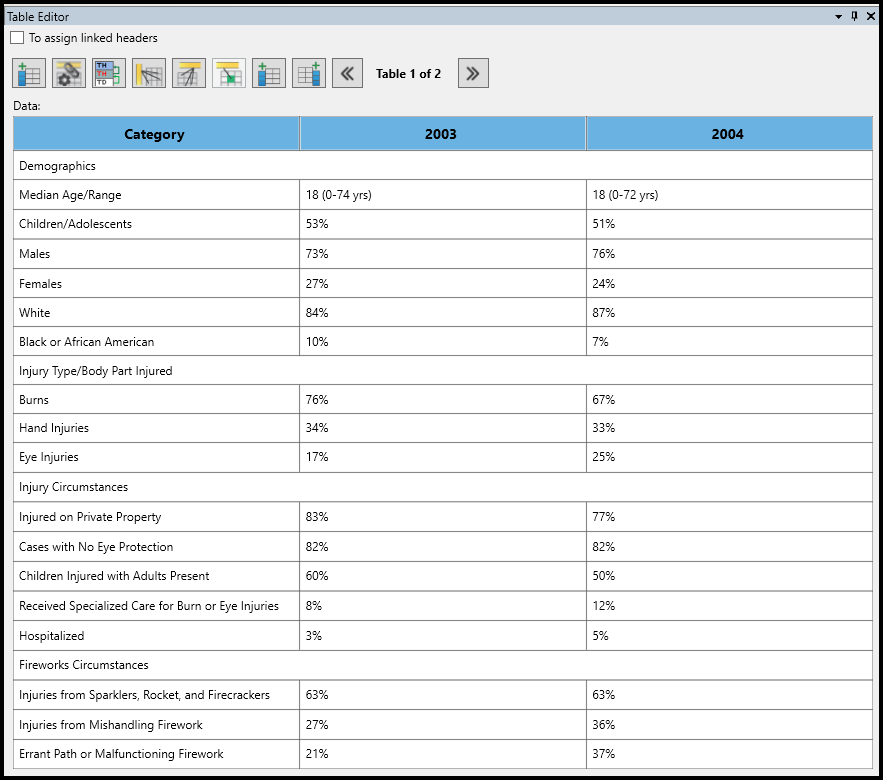
After
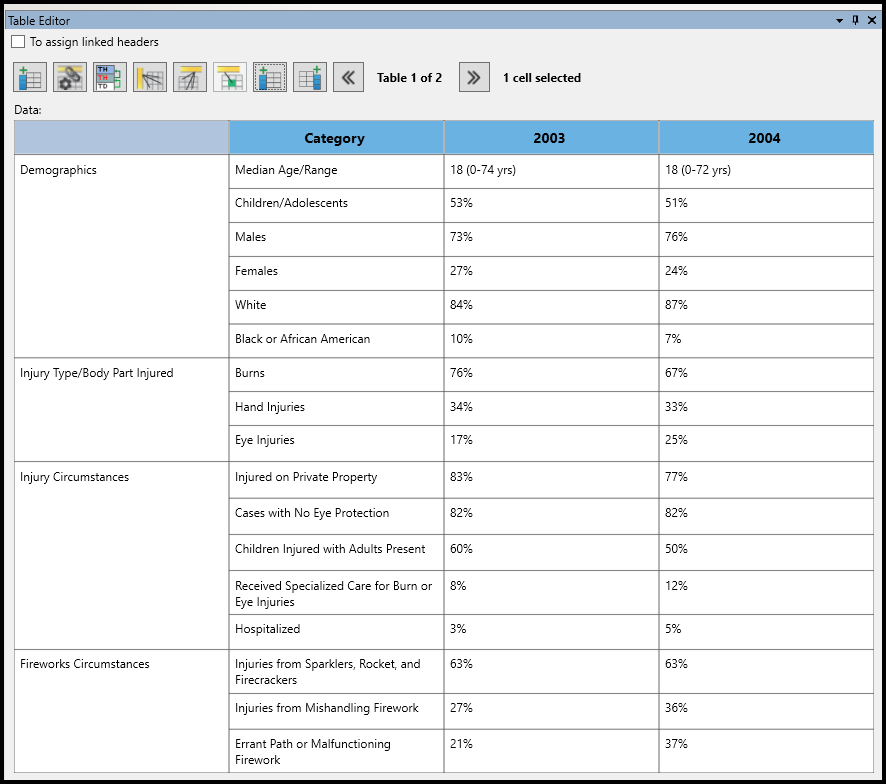
As you redraw a table, cells get added, moved, and deleted, so the Table Editor will stop matching the physical view of the table partway through. It can help to sketch out what the final redrawn table should look like on paper first, so you don't lose your place.
In this example, the row headers for Demographics, Injury Type, Injury Circumstances, and Fireworks Circumstances each get moved into a new column to the left of the row headers they relate to, and the Category column header moves to line up correctly with the row headers it applies to.
- Make sure the table is tagged properly.
- Open the Table Editor.
- Verify the table has the correct layout, inserting, merging, or deleting cells as needed, and making sure cells span the correct number of columns and rows. Adjust cell span in the Properties panel if needed.
Note: You're about to change how the table looks in the Table Editor, but it's best to start with the Table Editor's layout matching the physical view as closely as possible.
- Select the cell "Median Age/Range" and use the 7th button from the left at the top of the Table Editor to insert a cell before it.
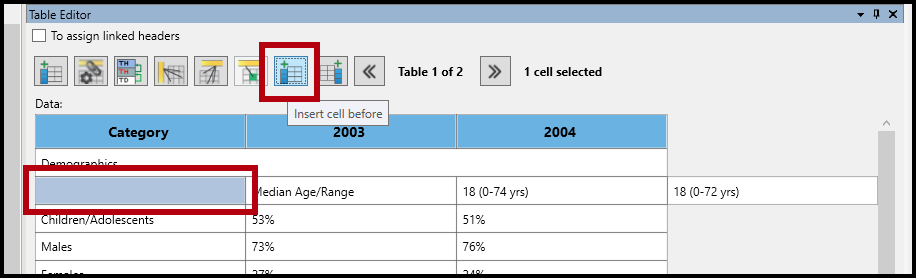
- With that new cell still selected, hold Ctrl and select the "Demographics" cell in the Table Editor, then merge the two cells (Ctrl+M). Selection order matters here.
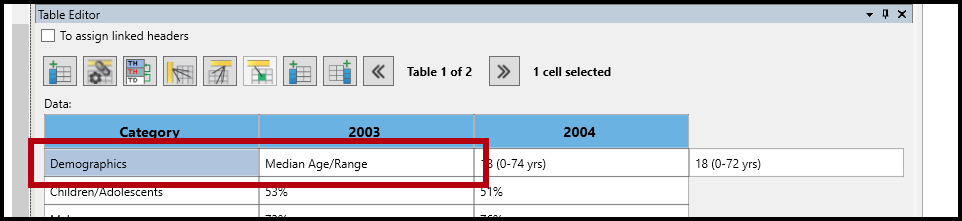
- With "Demographics" still selected, scroll to the bottom of the Properties panel to find the Row span property.
- Change the row span to 6, so "Demographics" spans all the rows it relates to.
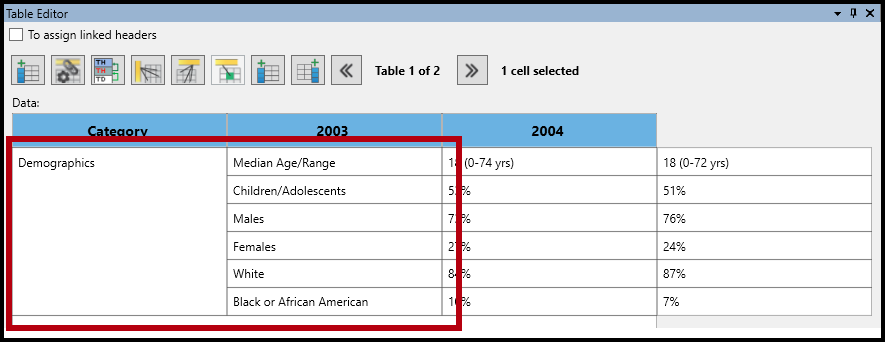
- Above where "Demographics" used to be, you'll have empty cells left over. Select them, using Shift or Ctrl to select more than one, and delete them.
This leaves an empty TR (Table Row) tag behind in the Tags tree. Run a Skip Empty Cells cleanup to remove it. See "Cleaning Up Empty Tags" if you need help with this.
Continue working down the rest of the table before coming back to fix the column headers at the top. - Repeat this process for "Injury Type/Body Part Injured," moving it down a row and merging it in front of "Burns."
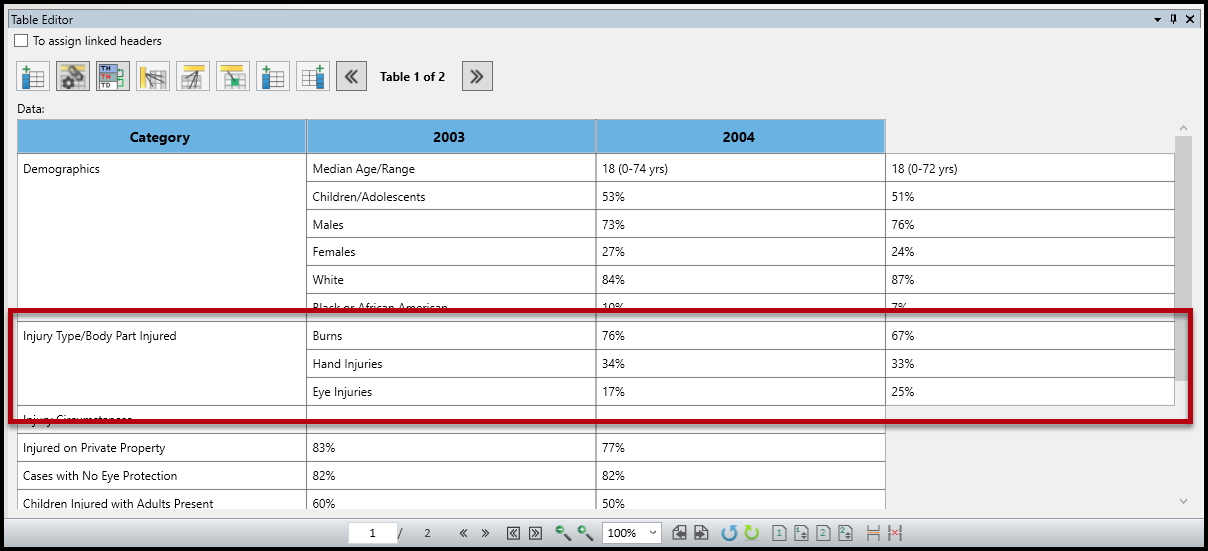
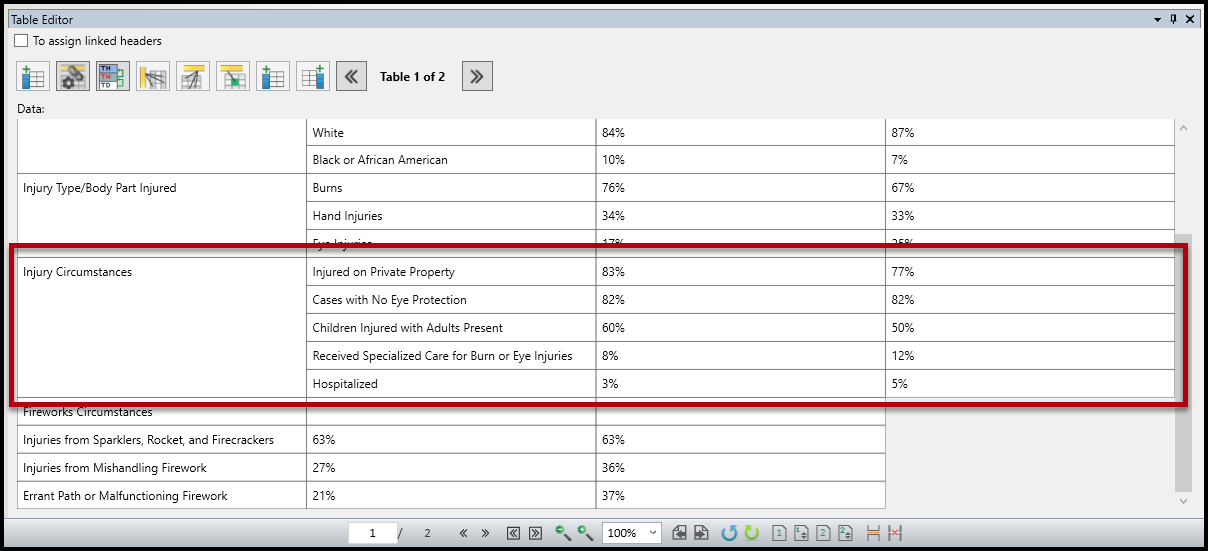
- Repeat the same process for "Injury Circumstances." Tip: its row span should end up set to 5.
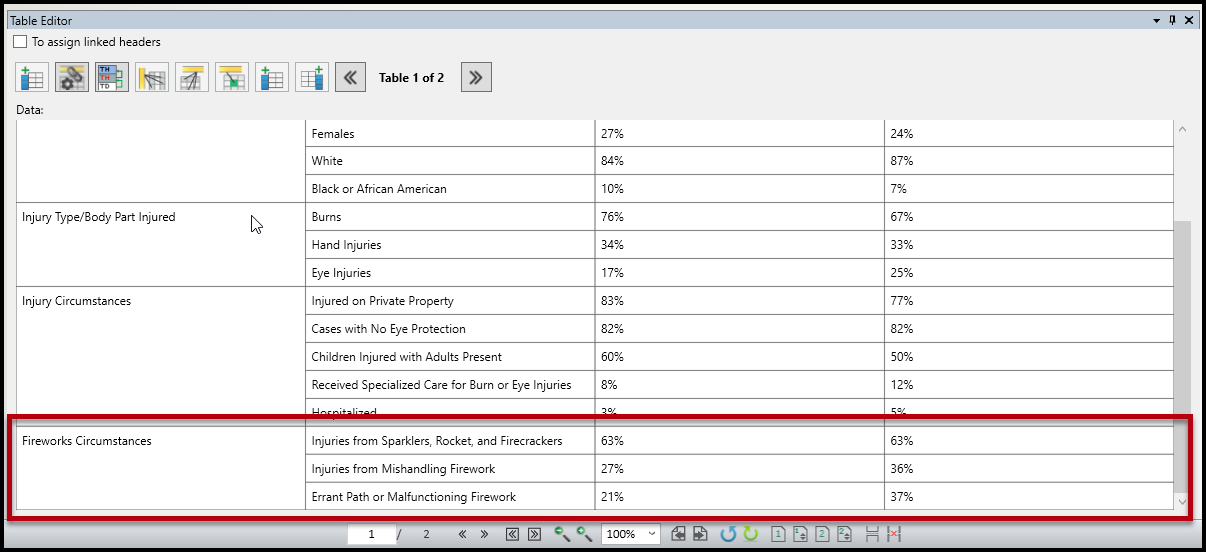
- Repeat the same process again for "Fireworks Circumstances." Tip: its row span should end up set to 3.
- Go back to the top of the Table Editor. You'll notice the column header cells no longer line up correctly with the data below them.
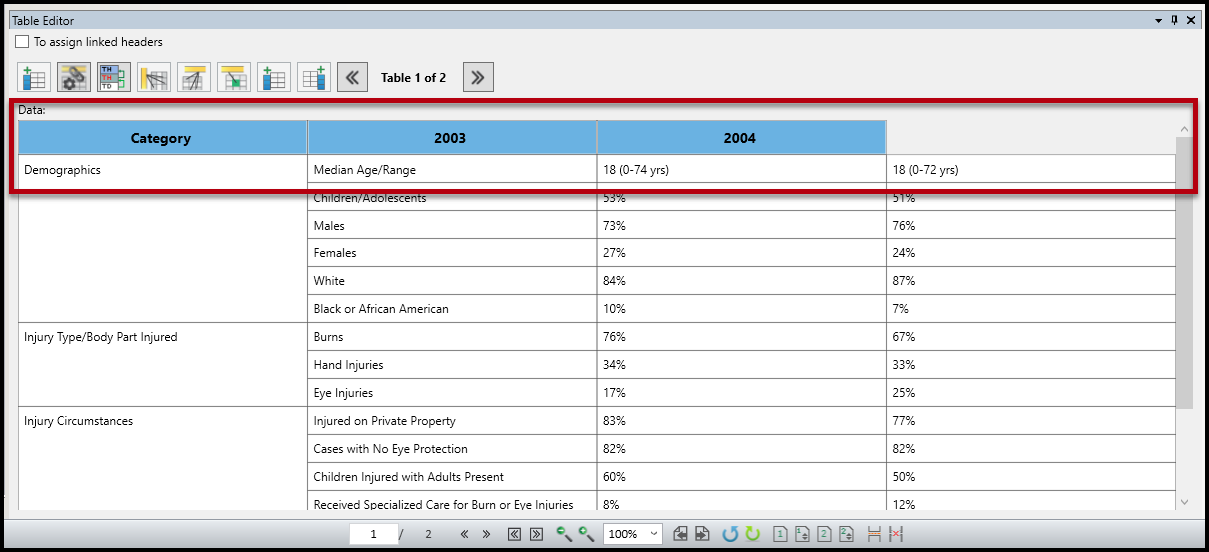
- Lining the column headers up correctly takes a bit of judgment. A few options to consider:
- If "Category" should be the header for just the first column, select it and use the eighth button at the top of the Table Editor to insert a cell after it.
- If "Category" should be the header for just the second column, select it and use the same Insert a cell before button from step 4.
- If "Category" should be the header for both of the first two columns, select it and change its column span to 2 in the Properties panel.
- Once the table is redrawn:
- Select all the column header cells and convert them to TH, assigning the scope of Column.
- Select all the row header cells and convert them to TH, assigning the scope of Row. After redrawing, this example table now has two columns of row headers.
- With your column and row headers set, use the second button from the left at the top of the Table Editor to generate one-level linked headers, the same as in the automatic linking steps above.
Another version of a complex table
Not every complex table needs cells moved the way the example above does. Here's a shorter variation to illustrate a different kind of adjustment.
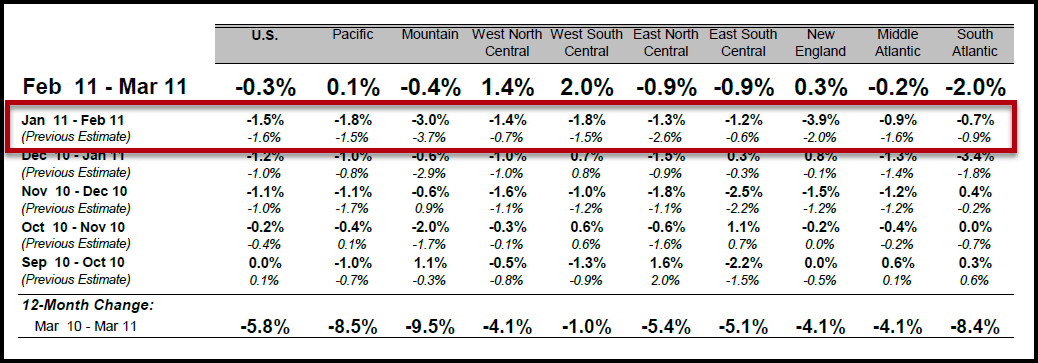
In this version, a cell like "Jan 11 - Feb 11" holds its own data and also serves as the row header for "(Previous Estimate)" in the row underneath it. Rather than moving "Jan 11 - Feb 11" down in front of "(Previous Estimate)," the way we moved cells in the example above, leave it where it is and change its row span to 2 instead. Since this changes the table's shape, you'll likely still need to add or delete other cells afterward so the table stays regularly shaped.
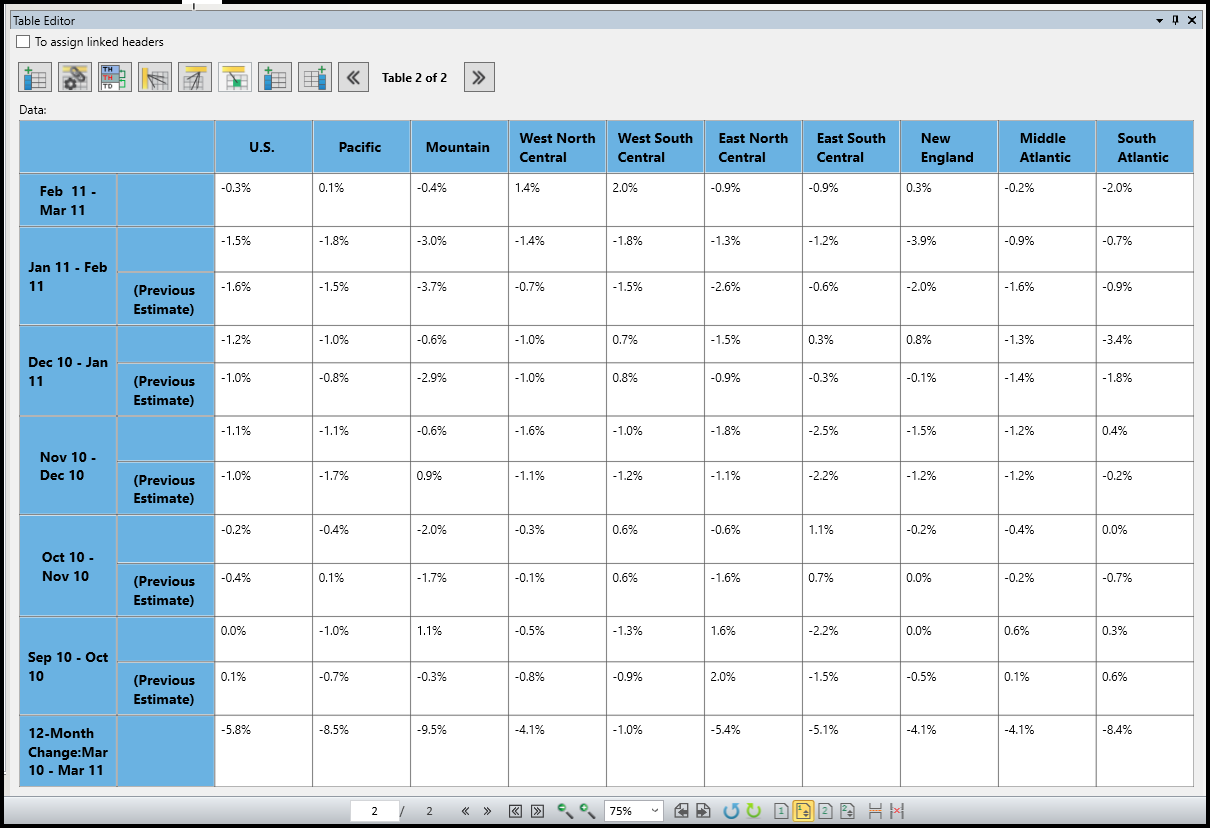
As with any table you manipulate, check for empty TR tags or empty data cells left behind, and remove them before linking, or the linking result will be incorrect.
Common Problems
Auto-linking doesn't seem to be connecting the right headers to the right data.
See "How to Correct a Generated Table in CommonLook PDF Desktop" to double-check the table's layout and header scope first, since auto-linking depends on both being correct. Most commonly, this is due to some TH cells not having scopes assigned, or the table being adjusted after the linking took place.
Not sure whether a table actually needs to be redrawn.
Check whether the headers line up directly with their data, and only their data. If they do, try automatic linking first. If they don't, redraw the table using the steps above.
Empty TR tags or cells are left over after redrawing.
See "How to Clean Up Empty Tags in CommonLook PDF Desktop."
Frequently Asked Questions
How do I know if my table is actually complex?
A table is complex if it has cells that span multiple columns or rows, more than one row of column headers, more than one column of row headers, or empty cells. Even a table with a simple-looking layout can count as complex if it has any of these.
Do I always need to redraw a complex table?
No. If the column and/or row headers already line up directly with their data cells, automatic linking will work without redrawing anything. Redrawing is only needed when the headers and data don't line up.
Does redrawing a table change how it looks on the page?
No. Redrawing only changes the table's structure in the tags, not its appearance in the physical document.
What if my table needs more than one set of cells redrawn to line up correctly?
That's normal for tables with several groups of row headers. Work through one group at a time, from top to bottom, and come back to the column headers at the top last, once every row header is in place.
Was this article helpful?
That’s Great!
Thank you for your feedback
Sorry! We couldn't be helpful
Thank you for your feedback
Feedback sent
We appreciate your effort and will try to fix the article