Product
CommonLook PDF Desktop Version
Feature
Tables
Document Element
Correcting a Generated Table, Table Layout, Table Components, Header Cells, Data Cells
Overview
After a table is generated or tagged, the Table Editor lets you adjust its layout and correct its header cells so the table matches the document's actual structure and is tagged correctly for assistive technology. This article covers steps that might need to be done after Generating a Table from Selection (covered in "How to Tag a Data Table in CommonLook PDF Desktop"), such as adjusting cell size, inserting, deleting, and merging cells, and tagging header cells with the correct scope.
Prerequisites
Before you begin, make sure you have:
- A table tag already created. See "How to Tag a Data Table in CommonLook PDF Desktop" if you haven't created one yet.
- The Table Editor open for that table. See "How to Use the Table Editor Toolbar in CommonLook PDF Desktop" for a refresher on opening it.
Steps to Follow
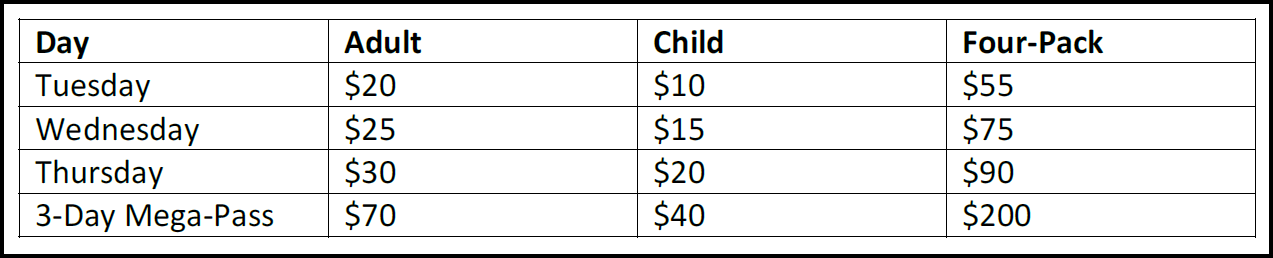
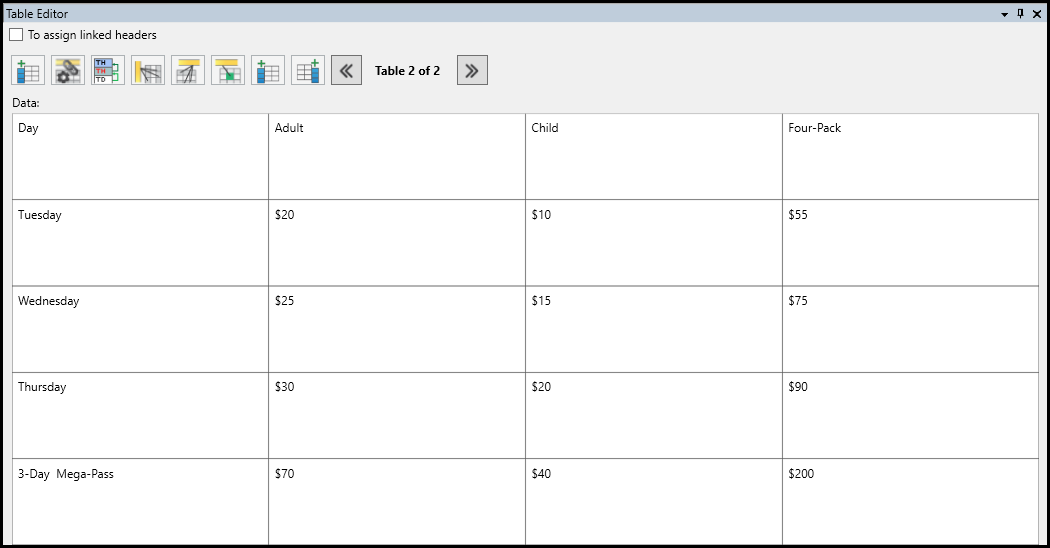
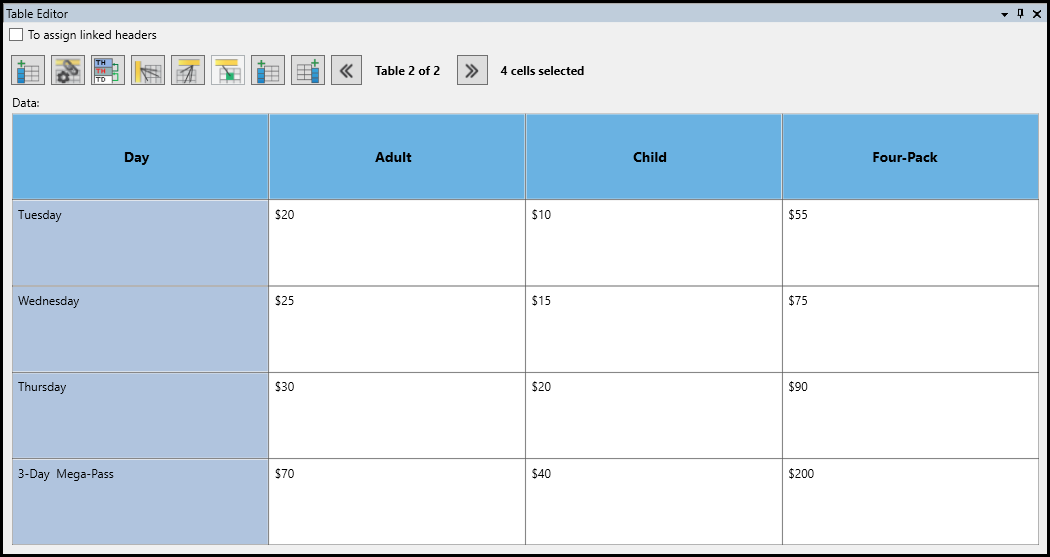
Here is the table that we will be using to showcase some of these needed scenarios.
 Adjust a cell's span
A generated table might have cells that are bigger or smaller than they should be. If that's the case, you'll need to adjust the cell's dimensions, also known as its span.
- Select the cell in the Table Editor.
- In the cell's Properties panel, on the lower right side of the screen, scroll to the bottom to find the row and column span settings.
Tip: If more than one cell's span is set incorrectly, you can adjust them all at once. Click any cell in the Table Editor, press Ctrl+A to select every cell, and set the span correctly. A common approach is to first set every cell to a row span of 1 and column span of 1, then adjust just the cells that are actually meant to be different dimensions.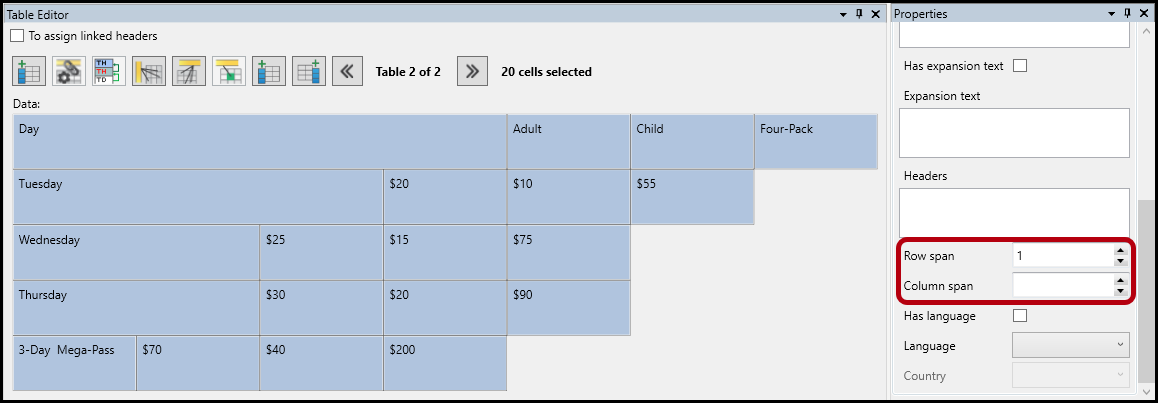
- Adjust the column or row span as needed, then press Tab when finished.
Insert a cell
Sometimes a generated table is missing a cell it should have, often because two pieces of content ended up tagged together as one cell. If that's the case, you'll need to insert a new cell to hold the missing content.
- Decide where the new cell needs to go.
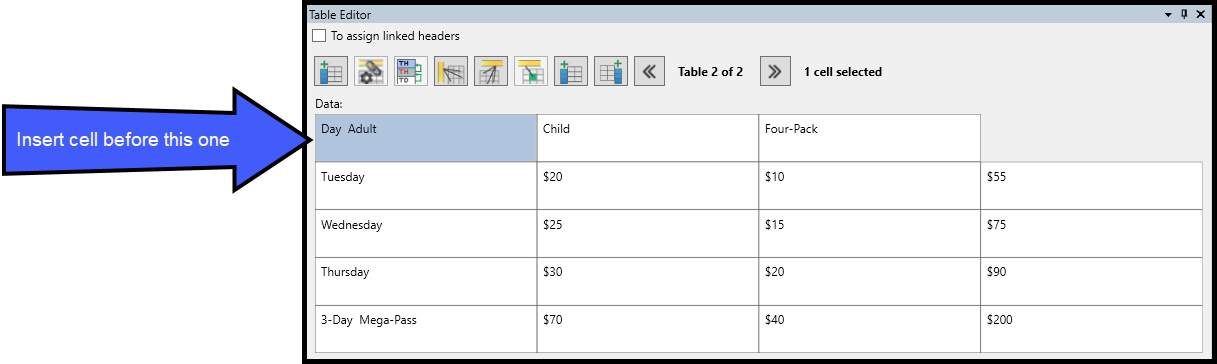
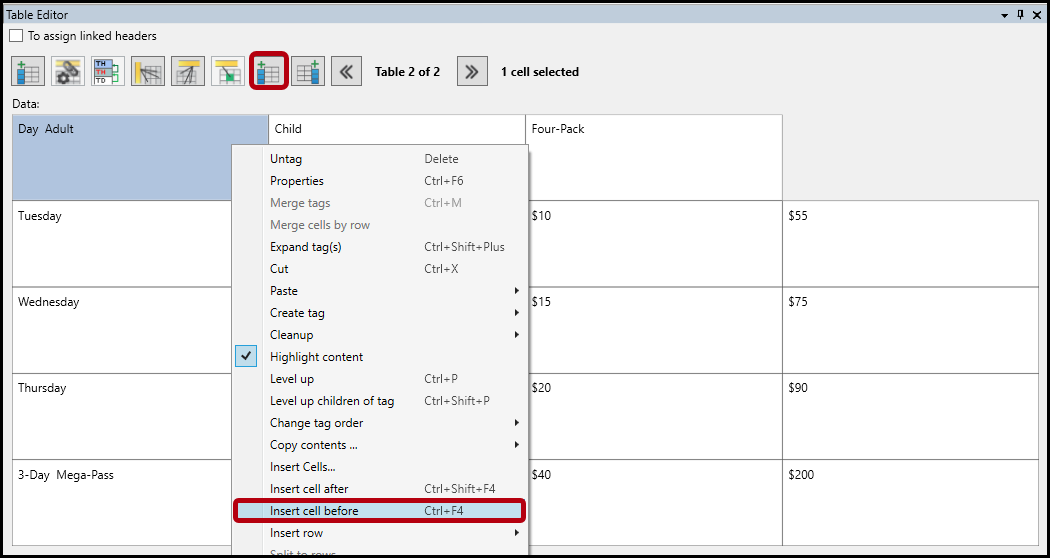
- Right-click, or otherwise open the context menu, on the cell the new one will go in front of, and choose Insert cell, then Insert cell before. You can also use the equivalent button in the Table Editor toolbar, highlighted below.
- Move the correct text into the new cell, and make any other needed property changes.
Delete a cell
A generated table can sometimes end up with an extra cell it doesn't need. If that's the case, you'll need to delete it.
- Select the unneeded cell in the Table Editor.
- Right click, or otherwise open the context menu.
- Select Untag, or press the Delete key.
TIP: If you're deleting an empty cell, running a Full cleanup will remove it too. A Full cleanup removes every empty cell in every table in the document, though, so use it carefully.
Merge cells
Sometimes a generated table has separate cells that should actually be combined into one, for example, when a single heading was meant to span multiple columns. If that's the case, you'll need to merge those cells together.
- Select the cells you want to merge.
- Right click, or otherwise open the context menu.
- Select Merge cells, or press Ctrl+M.
Be sure to select the cells in the correct order, since the merged cell's text will be read in the order the cells were selected, not their position in the table. A helpful habit is to select the destination cell first.
After adjusting, inserting, deleting, or merging cells, check for any empty Table Row (TR) tags or empty data cells left behind. Remove these before linking headers, or the linking result will be incorrect.
Tag header cells and assign scope
Even after a table's layout is correct, its header cells still need to be tagged properly so assistive technology can identify them. If your table's header cells aren't marked as Table Headers (TH) with the correct scope, you'll need to fix that here.

In the Table Editor, header cells appear with a blue background and bold text, making it easy to spot which cells are already tagged as headers.
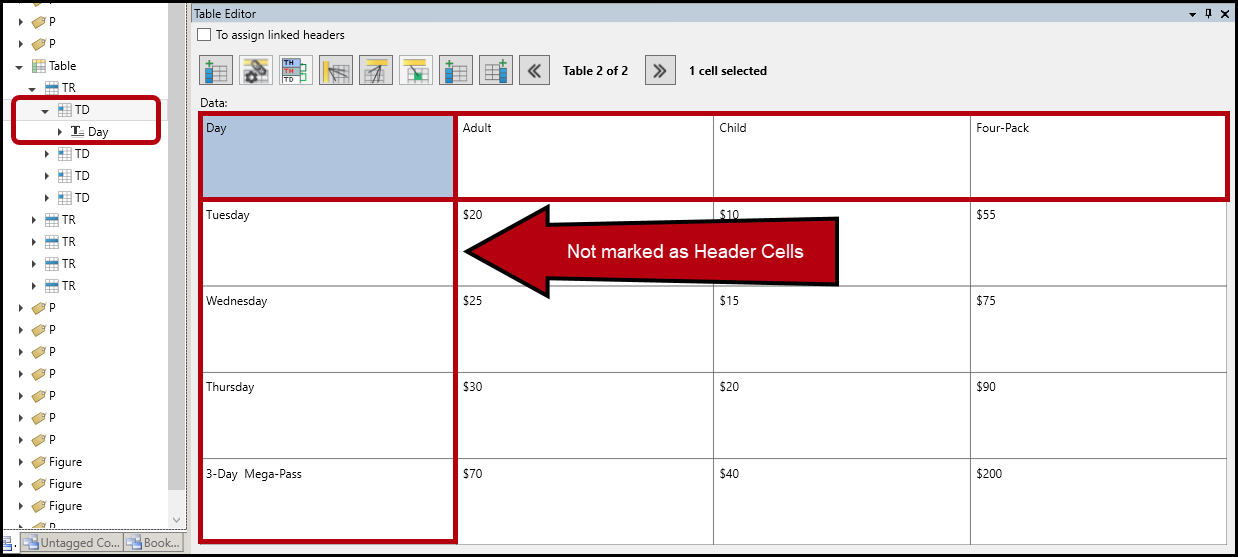
Don't confuse a cell that's only blue because it's currently selected with a properly tagged header cell. Once deselected, a selected but untagged cell won't stay blue, and its tag in the Tags tree will still show TD, not TH.
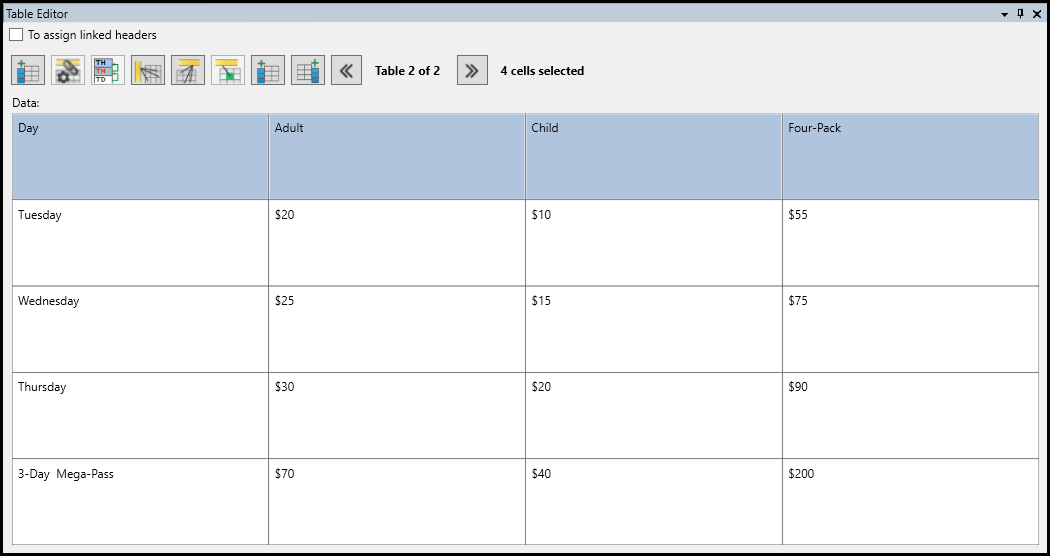
- Click the first cell in the top left corner of the table.
- Hold Shift and click the last cell in the top row. This selects every cell that needs to become a column header.
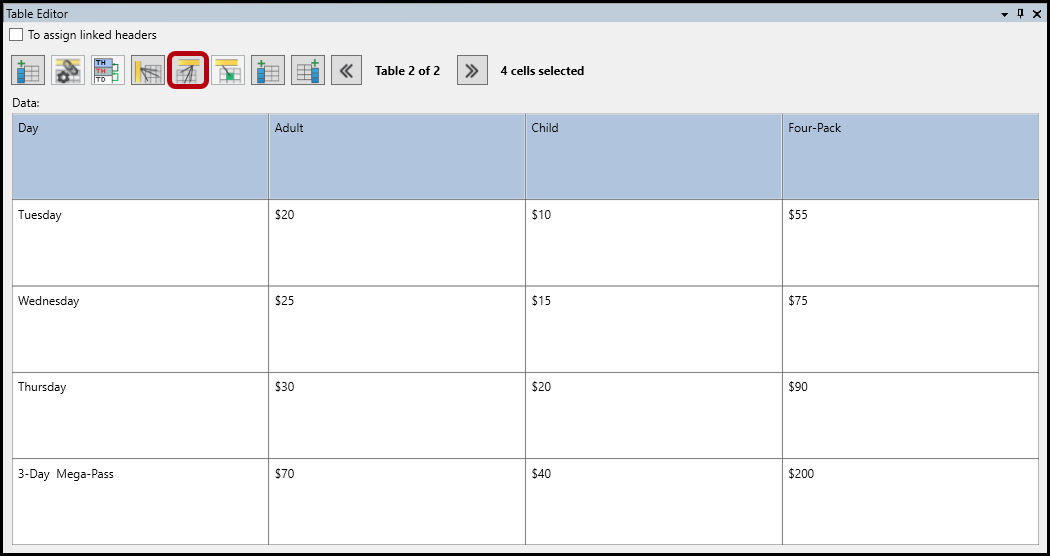
- Click the fifth button from the left in the Table Editor to convert the selected cells to TH and assign them the scope of column, all in one step.
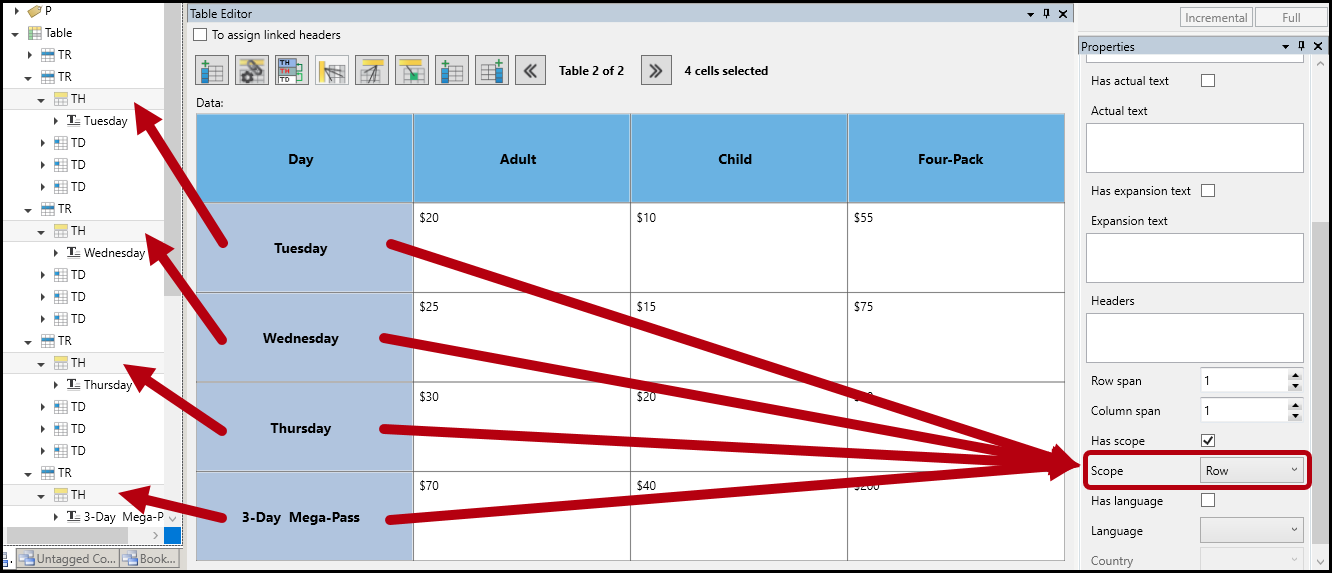
- Repeat the selection process, this time for the cells that need to become row headers.
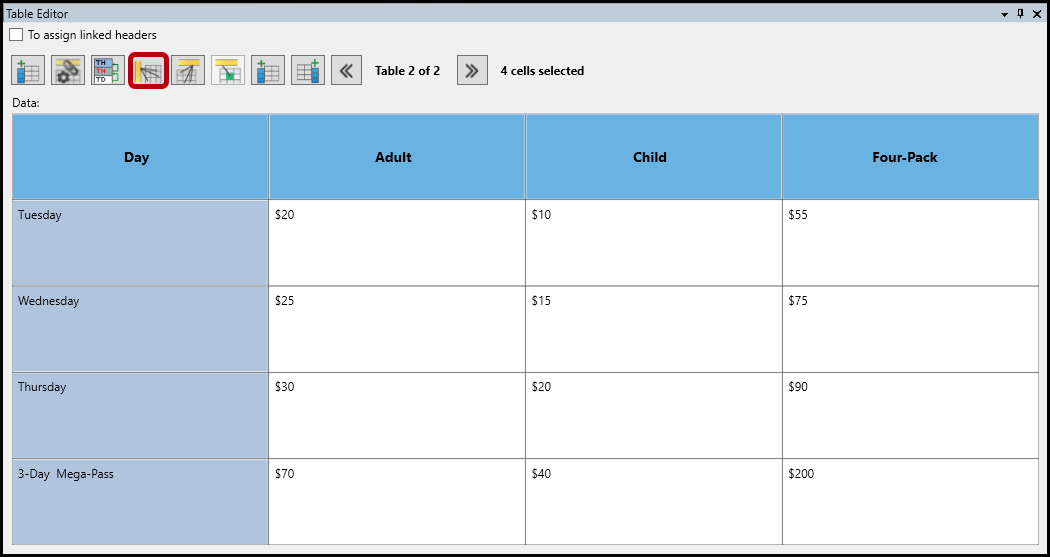
- Click the fourth button from the left in the Table Editor to convert the selected cells to TH and assign them the scope of row, all in one step.
- Click the X in the upper right corner of the Table Editor to close it.
Common Problems
Merged cell text reads in an unexpected order.
This happens when cells are merged in the wrong selection order. Redo the merge, selecting the destination cell first.
I ran a Full cleanup to remove one empty cell, and now cells are missing elsewhere too.
A Full cleanup removes every empty cell in every table in the document, not just the one you're working on. If you only need to remove a specific empty cell, untag it directly instead.
I'm receiving error messages about my table being irregular.
An irregular table is one that is not structured as a perfect square or rectangle, meaning that content is not accurately aligned in the Tags tree. To address this, add or remove cells through the Table Editor to better display the content in a regular structure.
I cannot select the table content, or some cell content is missing.
This is most common when the cell content is untagged. Adjust your selection settings to be able to select untagged content and attempt to generate the table from the selection a second time.
Im receiving error messages that my table is missing column or row headers, but I added the needed TH cells.
This happens most commonly when a cell is converted to TH, but the scope is not assigned. Select a TH cell and check the properties to see if the scope was assinged. If it is missing, assign it and rerun your validation check.
Frequently Asked Questions
What if a cell's span is still wrong after adjusting it in Properties?
Make sure you pressed Tab after entering the new value, since that's what applies the change. If it still looks wrong, select every cell in the table (Ctrl+A), reset all of them to a row span of 1 and column span of 1, then resize just the cells that need to be larger.
Is it safe to run a Full cleanup to remove an empty cell?
Only if you're fine removing every empty cell in every table in the document. If you just need to remove one specific empty cell, untag it directly instead.
How do I know if a header cell's scope was actually applied?
After assigning scope, keep the cells selected and check the Properties panel. It will show whether the scope is set to row or column, and the Tags tree will show the cells as TH instead of TD.
Was this article helpful?
That’s Great!
Thank you for your feedback
Sorry! We couldn't be helpful
Thank you for your feedback
Feedback sent
We appreciate your effort and will try to fix the article