Product
CommonLook PDF Desktop Version
Feature
Tables
Document Element
Table Editor
Overview
The Table Editor gives you a set of buttons for working with a table's cells, headers, and data, all from one panel. This article describes what each button does, in the order they appear from left to right, matching the numbers in the screenshot below.
Prerequisites
Before you begin, make sure you have:
- A table tag you're actively working on.
- Familiarity with the difference between header cells (TH) and data cells (TD). Navigate to the "How to Tag a Data Table in CommonLook PDF Desktop" if you need a refresher.
Steps to Follow
Open the Table Editor
Right click the table tag in the Tags tree, or otherwise open its context menu, then choose Table Editor near the bottom of the menu. The panel opens along the bottom of the interface, and can be resized for easier viewing.
Use the toolbar buttons
The buttons in the Table Editor are described below, numbered to match the screenshot.
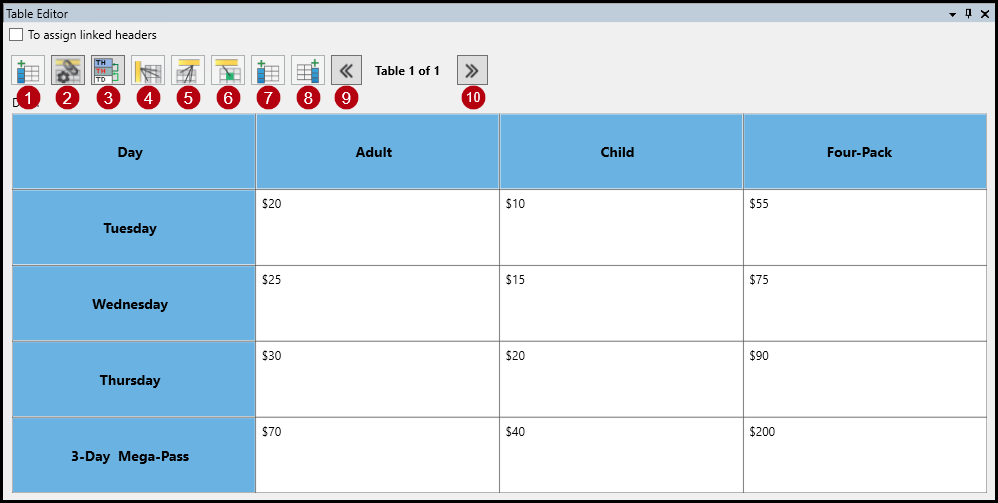
- Insert Cells: Adds any number of cells before or after the selected cell.
- Generate One Level Linked Headers: Once the needed cells are tagged as TH with the correct scope, this automatically links data cells to the closest column and row headers based on that scope. Certain standards require this linking for complex tables.
- Generate Recursive Linked Headers: Once the needed cells are tagged as TH with the correct scope, this automatically links data cells to every associated column and row header based on that scope. Certain standards require this linking for complex tables, but it isn't best practice, since it can cause some assistive technology to read parts of the table more than once. CommonLook recommends using Generate One Level Linked Headers (button 2) for complex tables instead.
- Convert to TH and Assign the Scope of Row: Converts the selected cells to TH and assigns the scope of row, making them row headers, in one step. If a cell is already a TH, the scope of row is still applied.
- Convert to TH and Assign the Scope of Column: Converts the selected cells to TH and assigns the scope of column, making them column headers, in one step. If a cell is already a TH, the scope of column is still applied.
- Convert to TD: Changes the selected cells to data cells. Data cells don't carry a scope.
- Insert Cell Before: Adds one cell before the selected cell.
- Insert Cell After: Adds one cell after the selected cell.
- Previous Table: Moves to the previous table in the document.
- Next Table: Moves to the next table in the document.
Common Problems
I used Generate Recursive Linked Headers, and now some content seems to read twice.
This is a known side effect of recursive linking. Switch to Generate One Level Linked Headers (button 2) instead, which covers what most standards require without the repeated reading.
I clicked a scope button on a cell that's already a header, and nothing seems to have changed.
The scope is still applied even if the cell is already tagged as TH, so it likely worked correctly. Check the cell's Properties to confirm the scope was set.
Frequently Asked Questions
What's the difference between a row header scope and a column header scope?
A row header scope means the header applies to the data across that row. A column header scope means it applies to the data down that column. Which one is correct depends on how the table is actually organized.
Should I use Generate One Level Linked Headers or Generate Recursive Linked Headers?
Generate One Level Linked Headers (button 2) is the recommended choice for most complex tables. Generate Recursive Linked Headers (button 3) links every associated header, but it can cause some assistive technology to read parts of the table more than once.
What happens if I use Convert to TD on a header cell?
It changes that cell into a data cell, and removes whatever scope it had. Data cells don't carry a scope.
Can I insert more than one cell at a time?
Yes. Insert Cells (button 1) lets you add any number of cells before or after the selected one. Insert Cell Before (button 7) and Insert Cell After (button 8) each add exactly one.
Was this article helpful?
That’s Great!
Thank you for your feedback
Sorry! We couldn't be helpful
Thank you for your feedback
Feedback sent
We appreciate your effort and will try to fix the article