Product
Advanced Editor (Web-based CL PDF)
Feature
Bookmarks
Document Element
Adding or regenerating bookmarks
Overview
Bookmarks are used to provide another means of navigation through a PDF. Ideally, the heading levels and the bookmarks should match.
Prerequisites
It is generally recommended that bookmarks be used for documents that are over nine pages long. However, there is no accessibility requirement that bookmarks are used in a PDF document.
Bookmark Settings
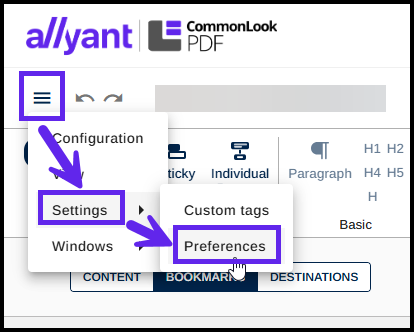
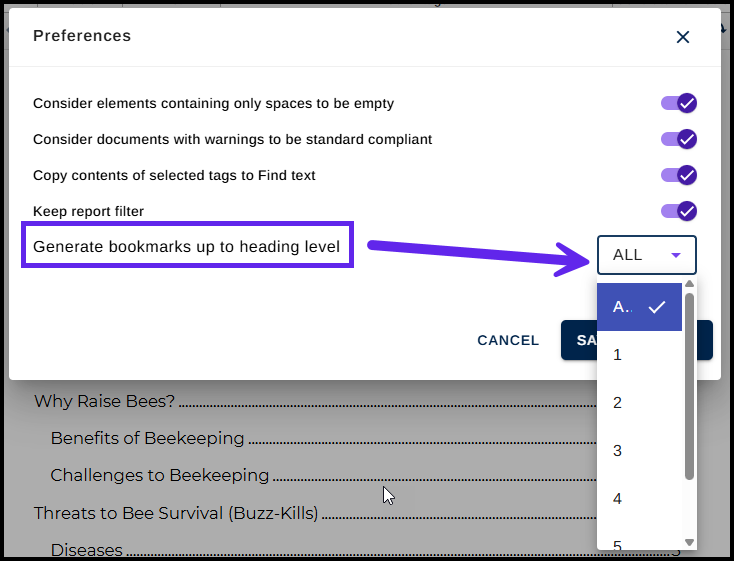
CommonLook's default setting for bookmarks is to generate them up to heading level 4. If you want to change this (to generate more or fewer bookmarks), you can adjust this in the User Preferences from the Ribbon in the Settings tab.
- Navigate to the "hamburger" menu at the upper left of the screen and expand it,
- Navigate to "Settings,"
- Select "Preferences."
- Expand the dropdown menu next to "Generate bookmarks up to heading level" and choose your desired heading level (or "A" for "all").
- Press Save.
Steps to Follow
To generate bookmarks based on heading levels, follow these steps:
- Remediate the document, being sure that heading level tags are used correctly.
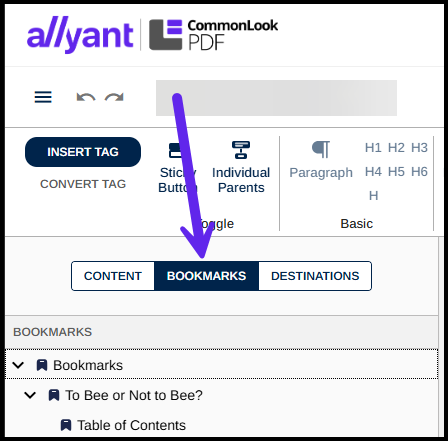
- Navigate to the Bookmarks panel by selecting the Bookmarks button.
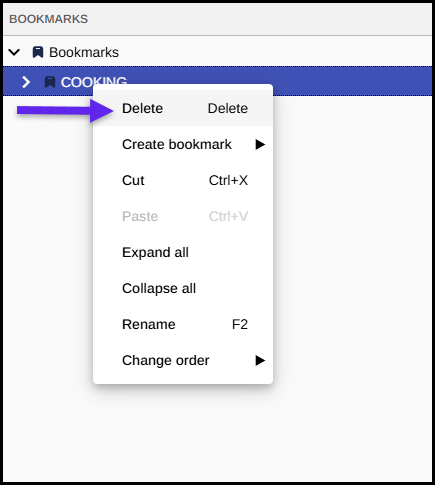
- If there are already bookmarks present, right-click on “Bookmarks” (or otherwise open the context menu) and choose Delete (or, select "Bookmarks" and use the Delete key on your keyboard. If there are not bookmarks already present, proceed to the next step.
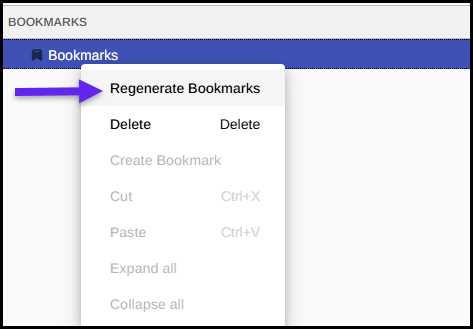
- Right-click (open the context menu) on "Bookmarks" again (if needed) and choose "Regenerate bookmarks."
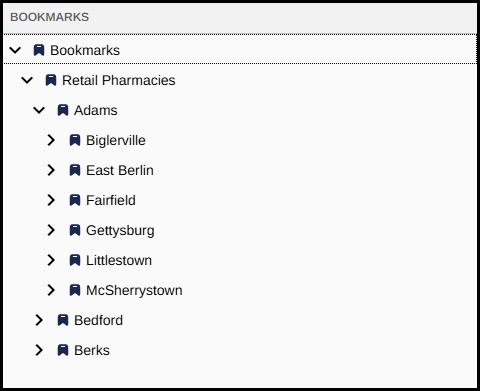
- When generated, the list of bookmarks will be closed. Double click on “Bookmarks” (or use the right-arrow key) to open them and verify the nested bookmarks inside. In the screenshot below, the bookmark for the Heading 1 (Retail Pharmacies) is open to show the H2 bookmarks – Adams, Bedford, and Berks. Likewise, the bookmark for Adams is open showing the H3 level bookmarks (Biglerville, East Berlin, Fairfield, etc.).
Frequently Asked Questions
Why am I getting a warning message when I run a verification that the Headings and the Bookmarks don't match? How can this be resolved?
If the Headings and the Bookmarks are not the same, you'll get a message telling you that the Headings and the Bookmarks don't match.
Here are some possible options to address this:
- Navigate to the Bookmarks panel, delete the bookmarks that are there, regenerate them, and then run an Incremental verification to see if that fixed it.
- Navigate to the Settings, adjust the bookmark creation level so that the bookmarks will be created up to your highest heading level used in the document, and run an Incremental verification.
- If you know that the headings and bookmarks should not match, if, for example, your organization only uses bookmarks up to H2 or H3 but your document goes to H5, then use Edit Checkpoint Status, change the Status to "Passed," and (optional, but suggested), enter a comment indicating that it's an organizational decision to only use bookmarks to heading level "X" ("X" being the heading number).
Was this article helpful?
That’s Great!
Thank you for your feedback
Sorry! We couldn't be helpful
Thank you for your feedback
Feedback sent
We appreciate your effort and will try to fix the article