Product
Advanced Editor (Web-based CL PDF)
CommonLook PDF Desktop Version
Feature
Form
Document Element
Mutually exclusive radio buttons
Overview
Forms containing mutually exclusive radio buttons can present a unique accessibility issue.
In Adobe Acrobat, radio buttons are normally made mutually exclusive by assigning all buttons in a group the same field name. However, Acrobat also assigns the same tooltip to all radio buttons that share that name. For accessibility, each radio button needs to communicate its individual choice to the user.
To address this issue, the radio buttons can be given unique field names and configured with JavaScript so that they continue to function as a mutually exclusive group. Each radio button can then be provided with an appropriate individual tooltip.
Important: Some screen readers may correctly announce mutually exclusive radio buttons that are created using Acrobat's standard radio-button grouping. However, this behavior can vary among screen readers. Documents should be remediated so that the controls provide the necessary information without relying on functionality specific to a particular screen reader.
This article focuses on configuring the radio buttons and adding JavaScript in Acrobat. For information about tagging the completed form fields, see Creating Properly Tagged Forms in the Related Articles section.
Prerequisites
- The radio button form fields should already be created in Adobe Acrobat.
- Identify all radio buttons that should behave as a single mutually exclusive group.
- Determine the visible choice associated with each radio button.
- Make sure you have permission to edit the form fields and add JavaScript to the PDF.
The example in this article uses four radio buttons named:
- RadioButton1
- RadioButton2
- RadioButton3
- RadioButton4
The first radio button has a Radio Button Choice, or Export Value, of Individual. The second uses Corporation.
Important: JavaScript is case-sensitive. Field names and choice values used in the JavaScript must exactly match those entered in Acrobat, including spelling, spaces, and capitalization.
Steps to Follow
Adding JavaScript to Radio Buttons
- Open the form in Acrobat.
- Open "Prepare Form" (may be "Form Editing" depending on your version of Acrobat.)
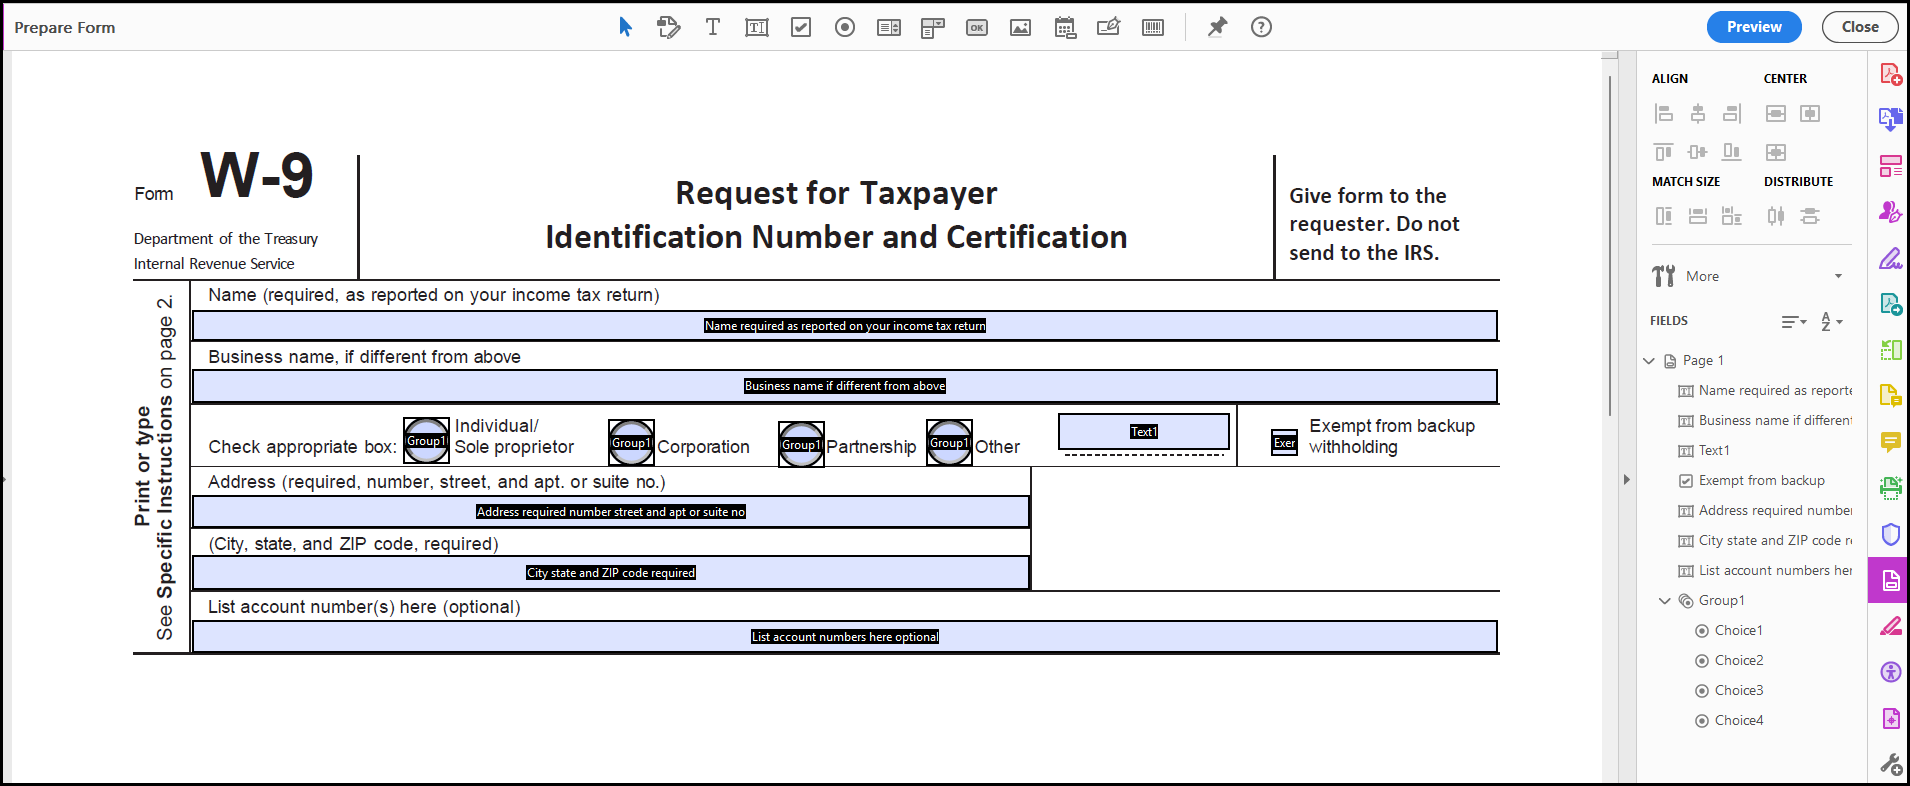
- Select the first radio button and then right-click (or otherwise open its context menu) and select “Properties.”
- When the Radio Button Properties window opens, in the “Name” field, enter a unique name. Note: To use the JavaScript provided below, type RadioButton1 for the name of the first button. Important Tip: Spelling, spaces, and capitalization matter for the JavaScript to work correctly!
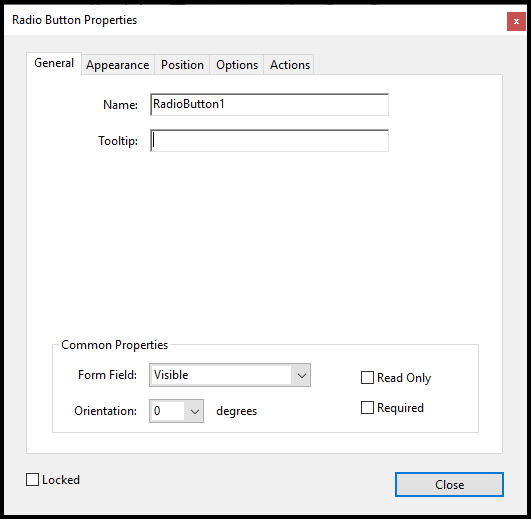
- If there is anything entered in the “Tooltip” field, delete it. (We're deleting the tooltip in this step because it's going to be the same for all of the radio buttons. Later, we can use the functionality in CommonLook to automatically provide individual tooltips. Refer to the article on Verification Checkpoints Related to Forms if needed.)
- Navigate to the Options Tab.
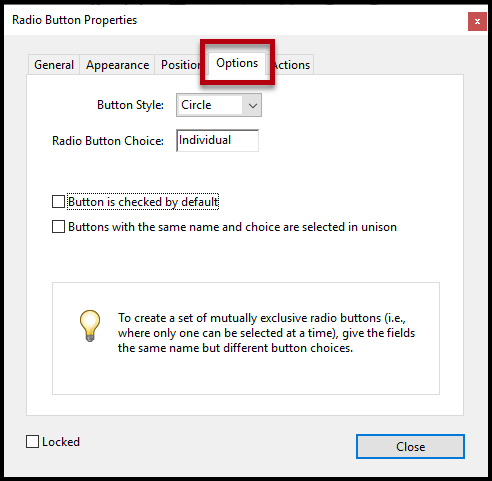
- Type the appropriate “Radio Button Choice” in the field. (“Radio Button Choice” may be called “Export Value” depending on the version of Acrobat being used.)
Note: To use the JavaScript below, type “Individual” for the Radio Button Choice of the first button. Remember, spelling, spaces, and capitalization matter for the JavaScript to work correctly! - One by one, select the remaining radio buttons, rename them, delete the tooltip, if present, and change their Radio Button Choices as needed.
Tip: If using the JavaScript provided, use the names RadioButton2 through 4 as appropriate. The Choice name is determined by the text in the physical view of the form that accompanies each radio button. - Once all radio buttons in the group have been named and the Radio Button Choices have been assigned, select the first radio button and navigate to the Actions tab.
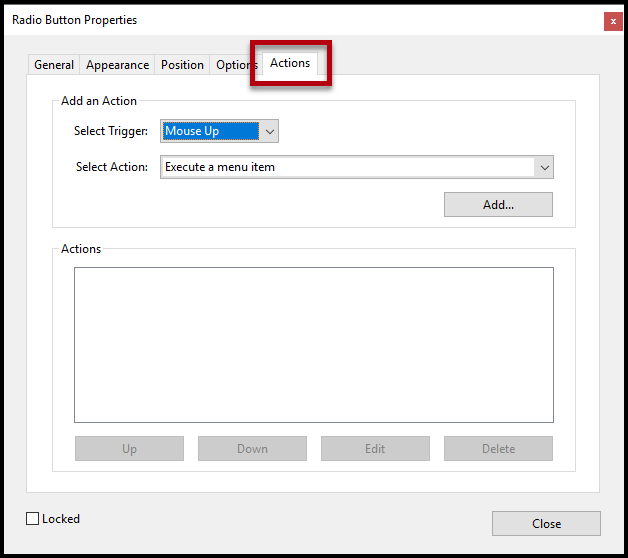
- From the “Select Trigger” dropdown menu, choose “Mouse Up.”
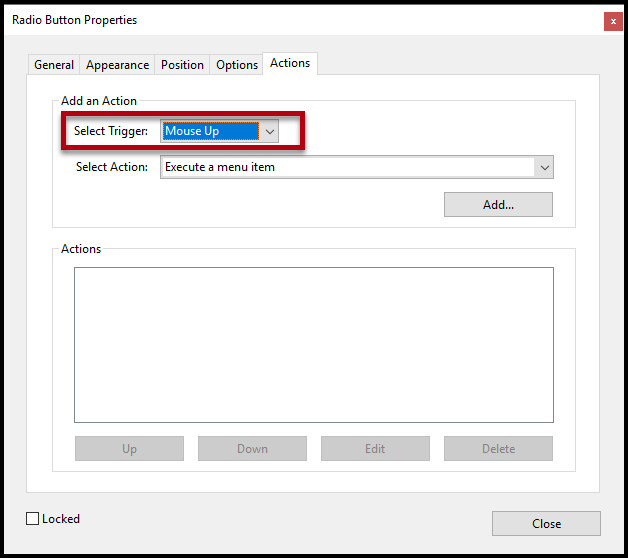
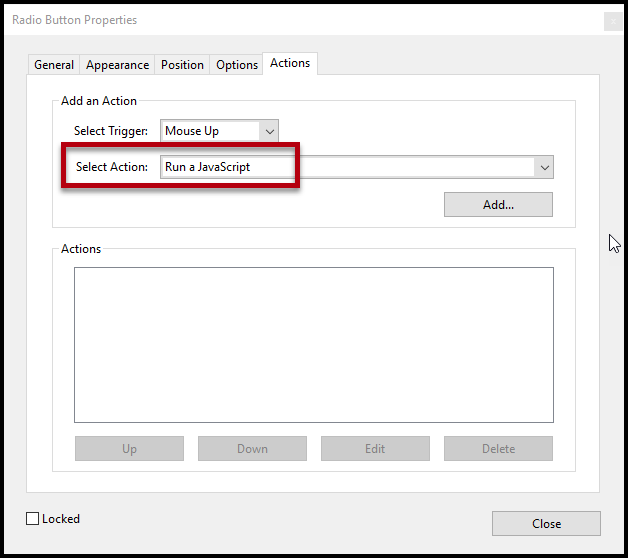
- In the “Select Action” dropdown, scroll to “Run a JavaScript.”
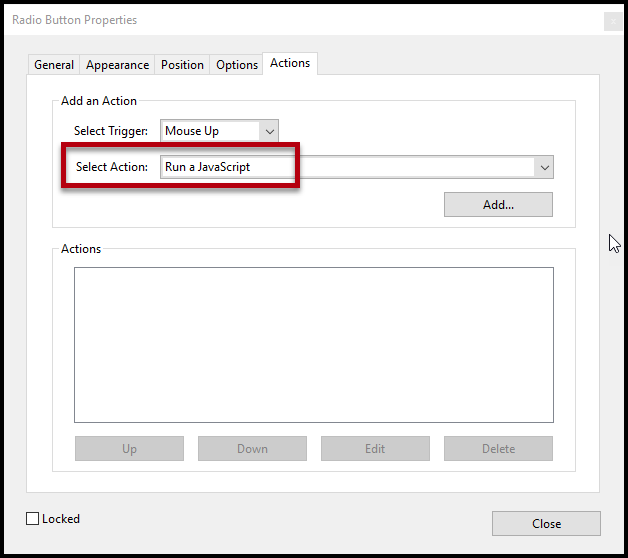
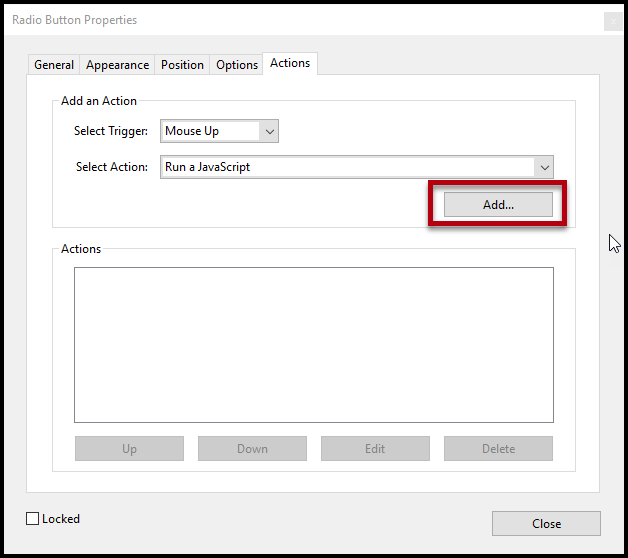
- Select "Add."
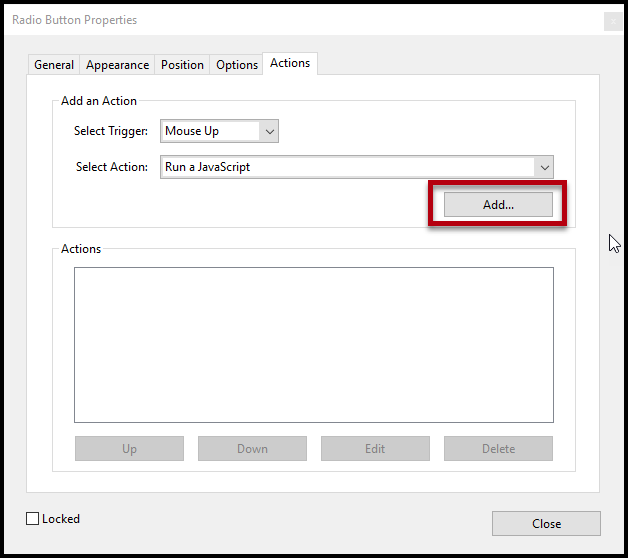
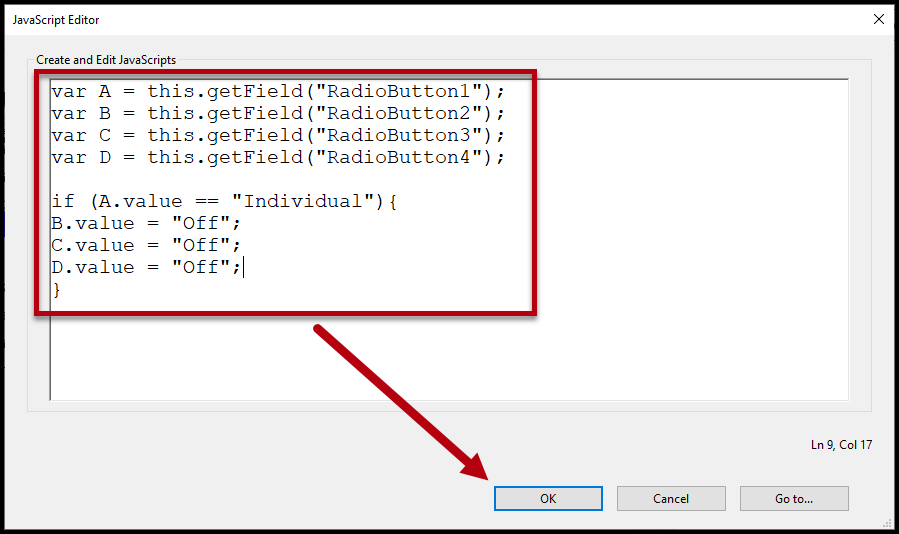
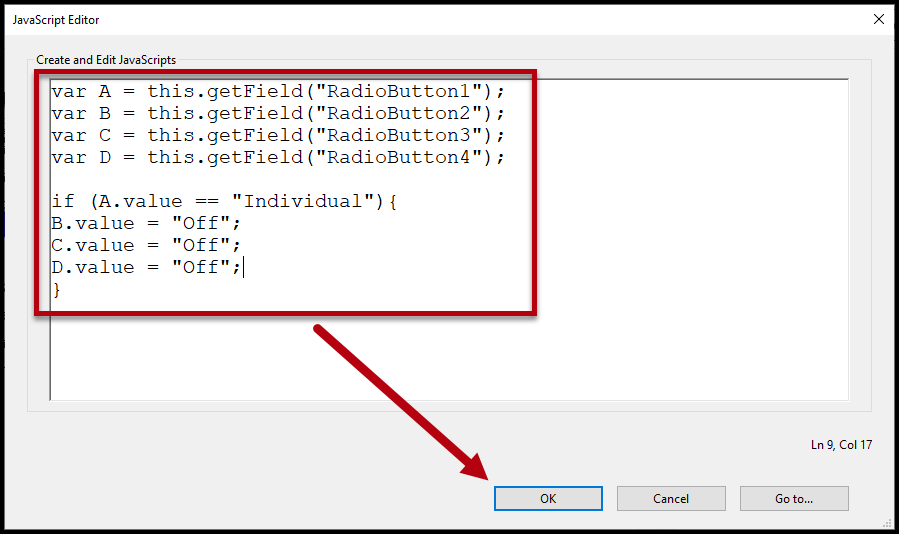
- In the JavaScript Editor window that opens, insert the following JavaScript:
var A = this.getField("RadioButton1");
var B = this.getField("RadioButton2");
var C = this.getField("RadioButton3");
var D = this.getField("RadioButton4");
if (A.value == "Individual"){
B.value = "Off";
C.value = "Off";
D.value = "Off";
}
NOTE: The code above assumes the radio button currently selected is named “RadioButton1” and has a radio button choice of “Individual.” It also assumes that other fields are named RadioButton2, RadioButton3 and RadioButton4, etc., and none has a radio button choice of “Off.”
Pro Tip: You're going to need to use this JavaScript again so if you've edited it at all, make sure you copy it before the next step! - Choose "OK."
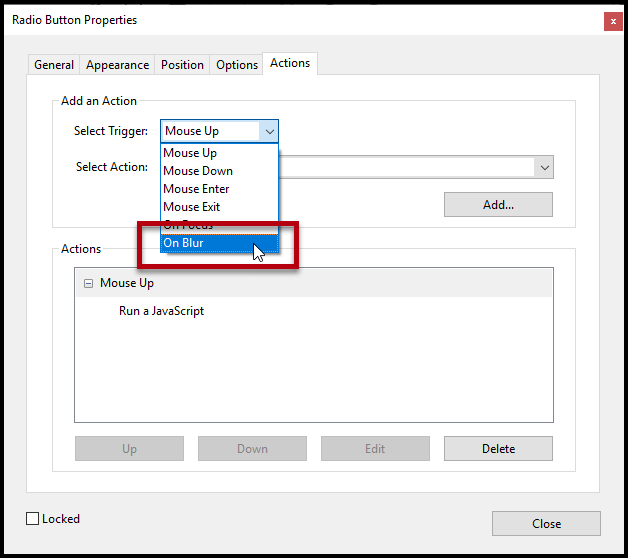
- Back in the Radio Button Properties dialog box, select “On Blur” from the Trigger drop-down menu and “Run a JavaScript” from the Action. (“On Blur” refers to when the focus is pulled off of the radio button because the user tabbed away from it. “On focus” is when the user tabs into the field).
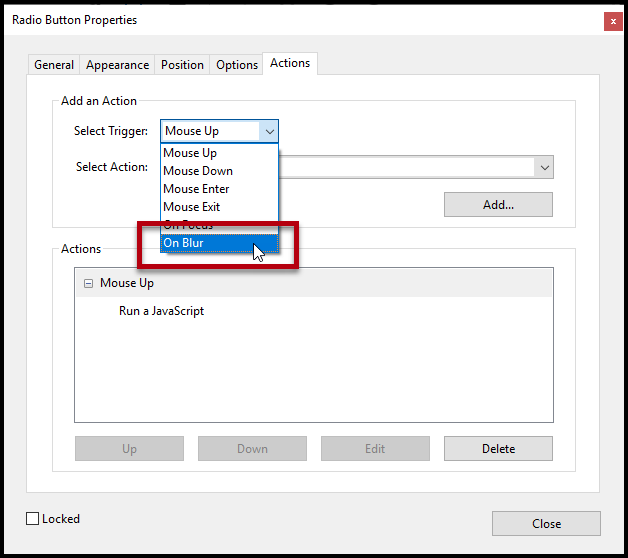
- As with the "Mouse Up" Trigger, choose “Add” and enter the same JavaScript that was used for “Mouse Up.”
- Select "OK."
- Select the second radio button in the physical view.
- in the Actions tab, verify that the Trigger is “Mouse Up” and the Action is to “Run a JavaScript.” Select "Add."
- Paste the JavaScript into the JavaScript Editor window.
Important Note: The JavaScript needs to be edited for the second (and subsequent) radio buttons – do not hit "OK" yet! - Edit the JavaScript. Because this is for the second radio button, the “if” statement (the second part of the JavaScript) will be edited as shown below. (Note that, for this example, the second radio button’s “choice” value is Corporation. The first part of the JavaScript, with the radio button names, does not change.)
if (B.value == "Corporation"){
A.value = "Off";
C.value = "Off";
D.value = "Off";
} - Copy the entire (edited) JavaScript.
- Click OK.
- Change the trigger for the second radio button to “On Blur,” click Add, and paste the copied edited JavaScript.
- Repeat the steps assigning triggers (Mouse Up and On Blur) to the other radio buttons and adding the appropriately edited JavaScript.
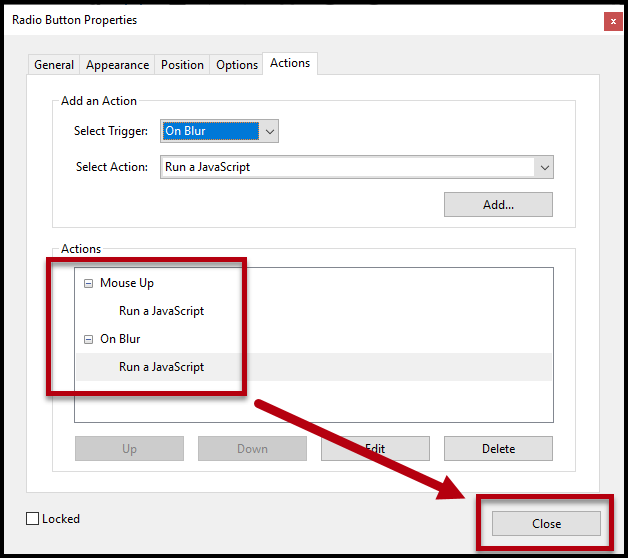
- Once all of the radio buttons have been assigned their Triggers and JavaScripts, choose the "Close" button in the Radio Button Properties dialog box.
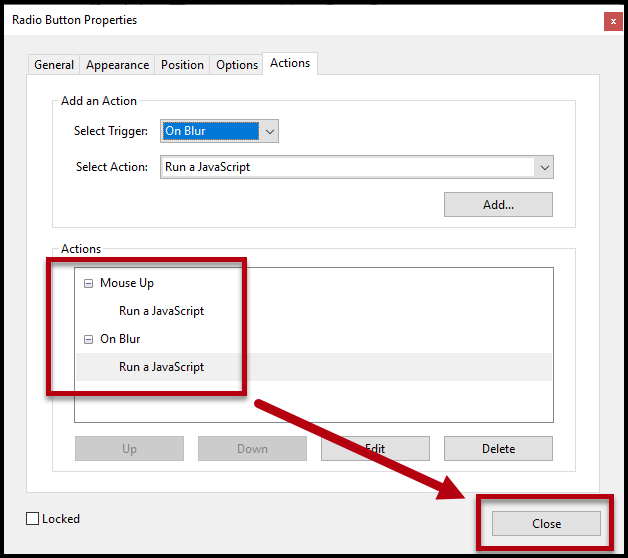
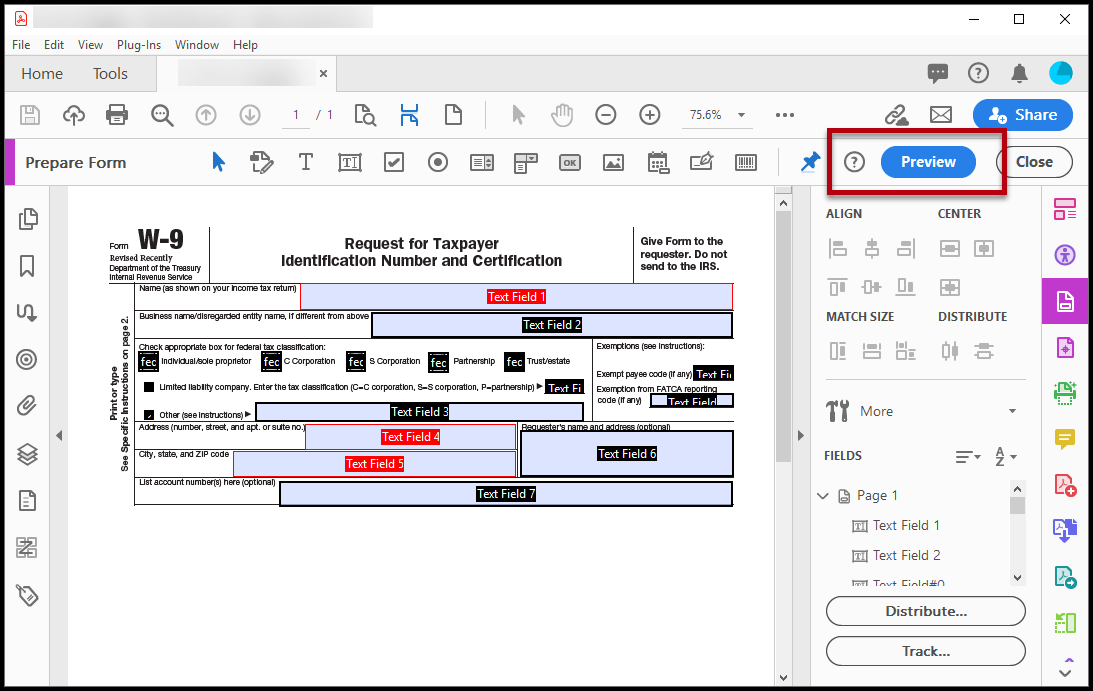
- In Acrobat DC, choose the "Preview" button back in "Prepare Form." (In older versions of Acrobat you may need to choose “Close Form Editing.”)
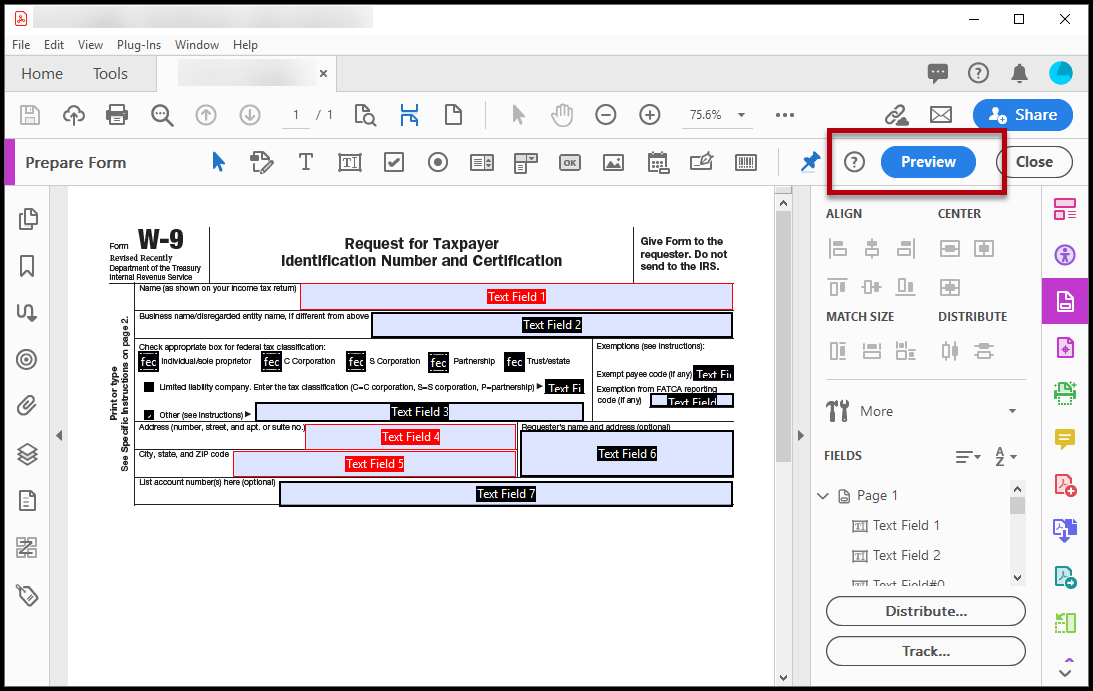
- Select the radio buttons in the document to make sure that, when selected, they turn on and, when a different radio button is selected, a previously chosen radio button is turned off. If more than one radio button can be selected at the same time then there is an error somewhere in either the naming of the radio buttons, their Radio Button Choices, or in the JavaScript that needs to be fixed.
Common Problems
More than one radio button can be selected
If multiple radio buttons can remain selected at the same time, check:
- Each radio button has the correct unique field name.
- Each Radio Button Choice/Export Value is correct.
- Field names in the JavaScript exactly match the field names in Acrobat.
- Choice values in the JavaScript exactly match the values in Acrobat.
- The appropriate value = "Off" statements are included for every other button in the group.
- The JavaScript has been added to both Mouse Up and On Blur.
Remember that spelling, spaces, and capitalization must match exactly.
The JavaScript works with the mouse but not with the keyboard
Verify that the JavaScript has been assigned to both the Mouse Up and On Blur triggers for each radio button.
The JavaScript stops working after changing a field name or choice
If a radio button's Name or Radio Button Choice/Export Value is changed in Acrobat, the corresponding value must also be changed in the JavaScript.
The group contains more or fewer than four radio buttons
The provided JavaScript is only an example for a four-button group. Add or remove field variables and value = "Off" statements to match the actual number of buttons.
Frequently Asked Questions
Why can't I simply give all of the radio buttons the same field name?
Acrobat normally creates mutually exclusive radio buttons by giving all buttons in the group the same field name. This also causes the buttons to share the same tooltip, which can prevent each choice from providing its own accessible name. Using unique field names allows each choice to be identified individually, while JavaScript preserves the mutually exclusive behavior.
Why is the tooltip removed in Acrobat?
Removing the shared tooltip allows each radio button to be provided with an appropriate individual tooltip during remediation. See Verification Checkpoints Related to Forms for more information about form field tooltips.
Why are both Mouse Up and On Blur actions used?
The form needs to work for users interacting with the radio buttons using different input methods. The Mouse Up action handles mouse interaction, while On Blur runs when focus leaves the field during keyboard navigation.
Can this method be used with check boxes?
Yes. The same general JavaScript approach can be used to make check boxes mutually exclusive.
For check boxes:
- Open the General tab of the Check Box Properties dialog and identify each check box's Name.
- Open the Options tab and identify each check box's Export Value.
- Replace the RadioButton# field names in the JavaScript with the actual check box field names.
- Replace the radio button choice values with the appropriate check box Export Values.
- Add the modified JavaScript to both the Mouse Up and On Blur actions for each check box.
If you change a check box's Name or Export Value, make the corresponding change in the JavaScript.
How should mutually exclusive radio buttons be tagged in CommonLook?
Each radio button and its associated text label should be placed in its own Form tag. Each Form tag should contain one text label and one radio button annotation.
Related Form tags can then be placed together within the appropriate structural container, such as a Paragraph tag, to maintain logical structure and reading order.
See Creating Properly Tagged Forms for detailed instructions.
What should the tab order be for the completed form?
Set the PDF's tab order to follow the document structure. This helps ensure that keyboard navigation follows the logical reading order of the document.
See Tab Order in the Related Articles section.
Related Articles
Add any related articles
Adding JavaScript to Radio Buttons
- Open the form in Acrobat.
- Open "Prepare Form" (may be "Form Editing" depending on your version of Acrobat.)
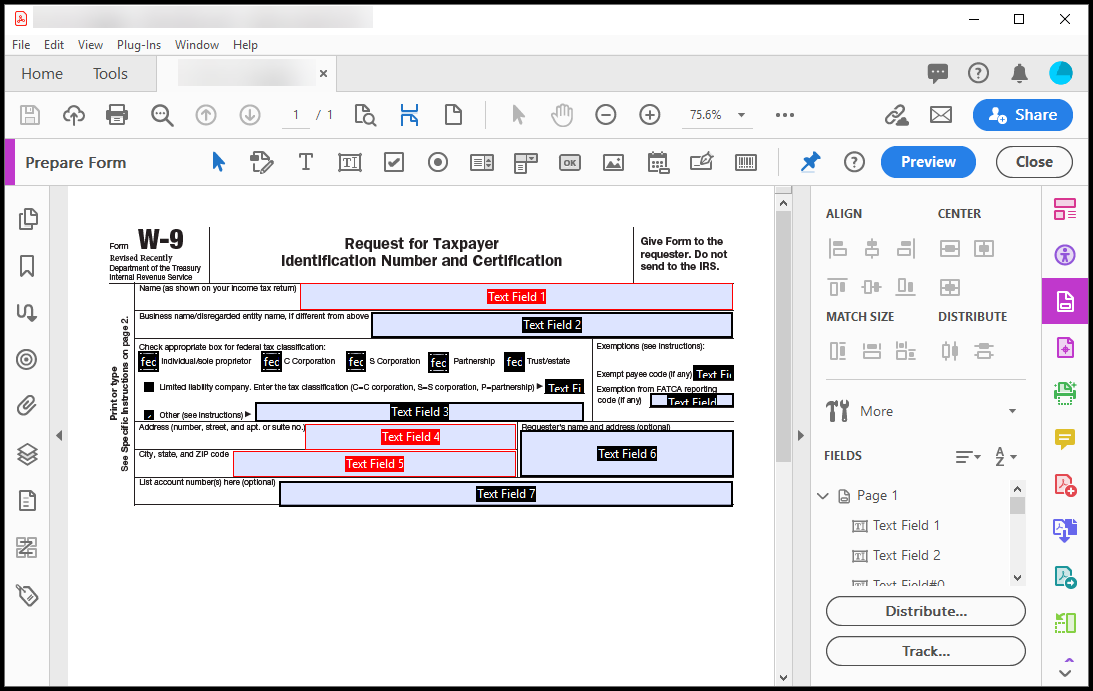
- Select the first radio button and then right-click (or otherwise open its context menu) and select “Properties.”
- When the Radio Button Properties window opens, in the “Name” field, enter a unique name. Note: To use the JavaScript provided below, type RadioButton1 for the name of the first button. Important Tip: Spelling, spaces, and capitalization matter for the JavaScript to work correctly!
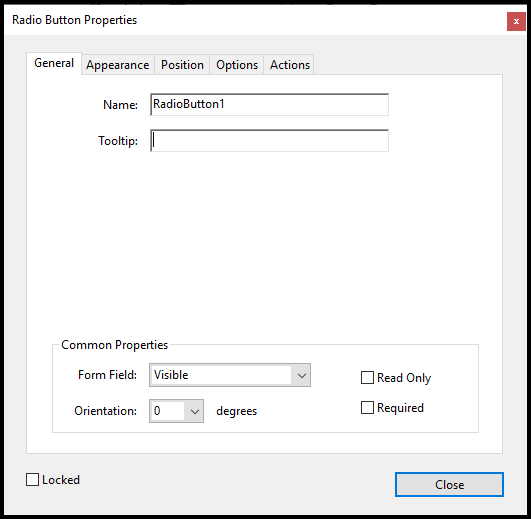
- If there is anything entered in the “Tooltip” field, delete it. (We're deleting the tooltip in this step because it's going to be the same for all of the radio buttons. Later, we can use the functionality in CommonLook to automatically provide individual tooltips. Refer to the article on Verification Checkpoints Related to Forms if needed.)
- Navigate to the Options Tab.
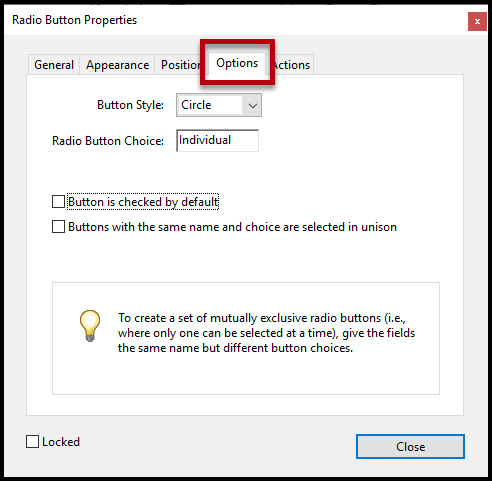
- Type the appropriate “Radio Button Choice” in the field. (“Radio Button Choice” may be called “Export Value” depending on the version of Acrobat being used.)
Note: To use the JavaScript below, type “Individual” for the Radio Button Choice of the first button. Remember, spelling, spaces, and capitalization matter for the JavaScript to work correctly! - One by one, select the remaining radio buttons, rename them, delete the tooltip, if present, and change their Radio Button Choices as needed.
Tip: If using the JavaScript provided, use the names RadioButton2 through 4 as appropriate. The Choice name is determined by the text in the physical view of the form that accompanies each radio button. - Once all radio buttons in the group have been named and the Radio Button Choices have been assigned, select the first radio button and navigate to the Actions tab.
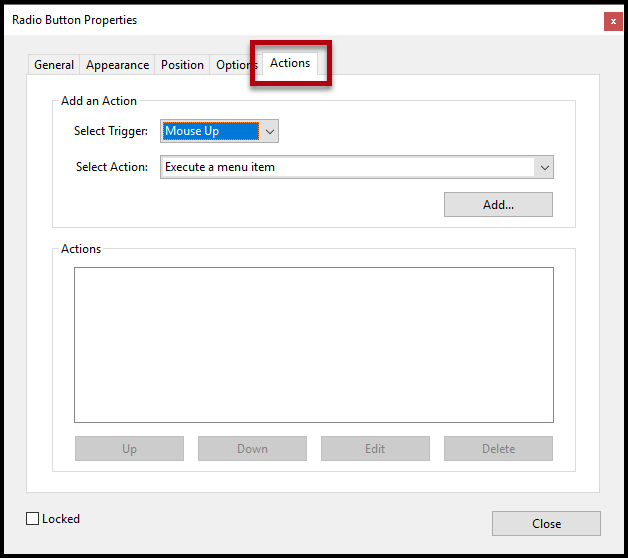
- From the “Select Trigger” dropdown menu, choose “Mouse Up.”
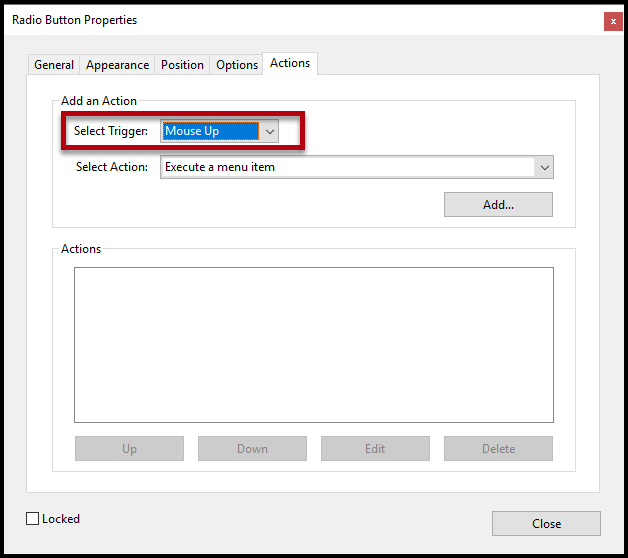
- In the “Select Action” dropdown, scroll to “Run a JavaScript.”
- Select "Add."
- In the JavaScript Editor window that opens, insert the following JavaScript:
var A = this.getField("RadioButton1");
var B = this.getField("RadioButton2");
var C = this.getField("RadioButton3");
var D = this.getField("RadioButton4");
if (A.value == "Individual"){
B.value = "Off";
C.value = "Off";
D.value = "Off";
}
NOTE: The code above assumes the radio button currently selected is named “RadioButton1” and has a radio button choice of “Individual.” It also assumes that other fields are named RadioButton2, RadioButton3 and RadioButton4, etc., and none has a radio button choice of “Off.”
Pro Tip: You're going to need to use this JavaScript again so if you've edited it at all, make sure you copy it before the next step! Choose "OK."
Back in the Radio Button Properties dialog box, select “On Blur” from the Trigger drop-down menu and “Run a JavaScript” from the Action. (“On Blur” refers to when the focus is pulled off of the radio button because the user tabbed away from it. “On focus” is when the user tabs into the field).
- As with the "Mouse Up" Trigger, choose “Add” and enter the same JavaScript that was used for “Mouse Up.”
- Select "OK."
- Select the second radio button in the physical view.
- in the Actions tab, verify that the Trigger is “Mouse Up” and the Action is to “Run a JavaScript.” Select "Add."
- Paste the JavaScript into the JavaScript Editor window.
Important Note: The JavaScript needs to be edited for the second (and subsequent) radio buttons – do not hit "OK" yet! - Edit the JavaScript. Because this is for the second radio button, the “if” statement (the second part of the JavaScript) will be edited as shown below. (Note that, for this example, the second radio button’s “choice” value is Corporation. The first part of the JavaScript, with the radio button names, does not change.)
if (B.value == "Corporation"){
A.value = "Off";
C.value = "Off";
D.value = "Off";
} - Copy the entire (edited) JavaScript.
- Click OK.
- Change the trigger for the second radio button to “On Blur,” click Add, and paste the copied edited JavaScript.
- Repeat the steps assigning triggers (Mouse Up and On Blur) to the other radio buttons and adding the appropriately edited JavaScript.
- Once all of the radio buttons have been assigned their Triggers and JavaScripts, choose the "Close" button in the Radio Button Properties dialog box.
- In Acrobat DC, choose the "Preview" button back in "Prepare Form." (In older versions of Acrobat you may need to choose “Close Form Editing.”)
- Select the radio buttons in the document to make sure that, when selected, they turn on and, when a different radio button is selected, a previously chosen radio button is turned off. If more than one radio button can be selected at the same time then there is an error somewhere in either the naming of the radio buttons, their Radio Button Choices, or in the JavaScript that needs to be fixed.
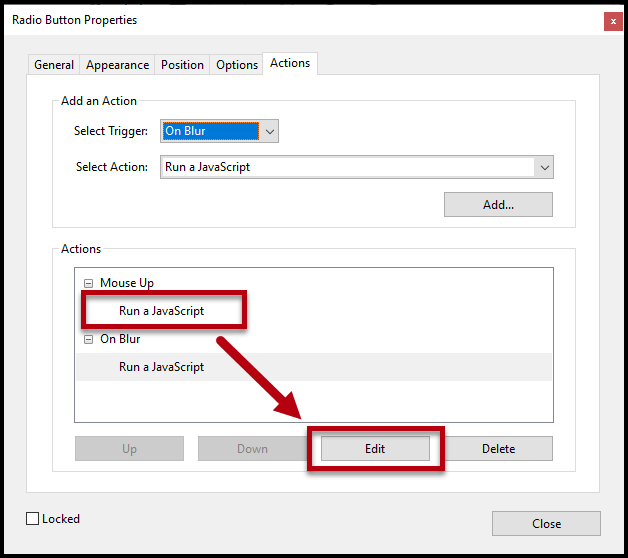
Tip: If errors need to be corrected, go back into the form editing mode, select the radio button and open the Properties panel. Check that the Names and Radio Button Choices are correct and then, if needed, in the Actions tab, in the lower panel, choose “Run a JavaScript” and then "Edit."
Mutually Exclusive Check Boxes
If you wish to make check boxes in a PDF document mutually exclusive, you can also use the same JavaScript with some minor changes:
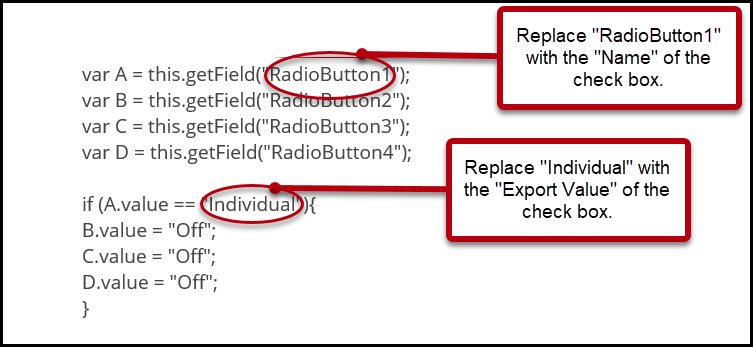
- In the General tab of the Check Box Form Properties dialog box, you will see the "Name" assigned. You will need to note the "Name" of the check boxes, possibly copying and pasting it into a "holding" document. You will replace the "RadioButton#" in the JavaScript with the "Name" of the check box.
- Open the Options tab and you will find the "Export Value" assigned to the checkbox. You'll need to know what the "Export Values" are for each checkbox, too. You might want to copy and paste those into your "holding" document as well.
*Please note that you can change the Name and Export Values of the checkboxes in the Form Properties, but these changes will also have to be reflected in the JavaScript too. - Make the needed changes to the JavaScript and proceed to step 9 in the preceding directions to ensure you add Java Script to both the "Mouse Up" and "On Blur" actions.
An important note about the JavaScript:
The JavaScript used in the example above uses radio button names 1 through 4. If there are more (or fewer) than four radio buttons that need to be grouped together, edit the JavaScript appropriately. For example, if there are five radio buttons on the form, add another line to the script for “RadioButton5.” Of course, in the lower half of the script, a line will need to be added for “E.value = “Off”;” as well. If there are fewer than four radio buttons, remove the extra lines from the script.
Reminders When Tagging Forms
- When tagging forms with mutually exclusive radio buttons, the text labels and the individual radio buttons are placed in their own Form tags (one text label and radio button annotation per Form tag). Later, for appropriate structure and reading order, all “related” Form tags can be placed in the same Paragraph tag. Refer to the article "Creating Properly Tagged Forms if needed.
- Force the tabbing order to follow the document’s structure. Read the article on Tab Order for more information.
Didn't find what you're looking for? Navigate to our "Forms" section for more related articles that may help!
Was this article helpful?
That’s Great!
Thank you for your feedback
Sorry! We couldn't be helpful
Thank you for your feedback
Feedback sent
We appreciate your effort and will try to fix the article